
There’s nothing quite like sinking your teeth into tender, smoky BBQ ribs with a perfectly caramelized glaze that sticks to your fingers and makes you reach for napkin after napkin. Whether you’re firing up the grill for a summer cookout or craving that authentic BBQ flavor in the middle of winter, this foolproof recipe delivers restaurant-quality ribs that will have everyone asking for seconds.
This isn’t just another ribs recipe – it’s a masterclass in achieving that perfect balance of smoky depth, tender meat that pulls cleanly from the bone, and a sticky-sweet glaze that caramelizes into pure perfection. The secret? A combination of low-and-slow cooking, a perfectly balanced spice rub, and a tangy-sweet BBQ sauce that penetrates every fiber of the meat.
Why You’ll Love This Recipe
Restaurant-quality results at home – These ribs rival anything you’d get at your favorite BBQ joint, but you’re making them in your own kitchen (or backyard) without the hefty price tag.
Incredibly tender meat – The low-and-slow cooking method breaks down the connective tissue perfectly, resulting in meat that practically falls off the bone while still maintaining its structure.
Versatile cooking methods – Whether you’re using an oven, smoker, or grill, this recipe adapts beautifully to whatever equipment you have available.
Make-ahead friendly – You can prep the ribs a day in advance, making them perfect for entertaining without the last-minute stress.
Customizable flavor profile – The base recipe is spectacular, but it’s also incredibly adaptable to your personal taste preferences and heat tolerance.
Understanding Your Ribs: A Complete Breakdown
Before we dive into the recipe, let’s talk about what makes these ribs special. Baby back ribs come from the upper portion of the pig’s rib cage, near the backbone. They’re shorter, more curved, and generally more tender than spare ribs, with less fat and more meat close to the bone.
The spice rub is where magic begins. Smoked paprika provides that essential smoky depth without requiring hours in a smoker. Brown sugar creates a sweet crust that caramelizes beautifully, while also helping to balance the heat from the cayenne. Garlic and onion powder add savory complexity, and the combination of black pepper and cayenne gives just enough kick without overwhelming the palate.
The membrane on the back of the ribs is crucial to remove. This thin, silvery layer doesn’t break down during cooking and creates a barrier that prevents your rub and sauce from penetrating the meat. Use a paper towel to grip one corner and peel it off in one satisfying sheet.
The Secret to Perfect BBQ Ribs
The low-and-slow cooking method is non-negotiable for truly tender ribs. At 275°F in the oven (or 225°F in a smoker), the collagen in the meat slowly breaks down into gelatin, creating that melt-in-your-mouth texture. Cooking at high heat will give you tough, chewy ribs – patience is your friend here.
Wrapping in foil (often called the “Texas Crutch” in BBQ circles) serves multiple purposes. It traps moisture, preventing the ribs from drying out during the long cook. It also speeds up the cooking process slightly and helps the meat become incredibly tender. Some pitmasters swear by adding a splash of apple juice or beer to the foil packet for extra moisture and flavor.
The final uncovered baking phase is where the visual magic happens. This high-heat finish caramelizes the sugars in the BBQ sauce, creating that gorgeous, glossy, sticky coating that defines great BBQ ribs. Multiple layers of sauce, applied every 10 minutes, build up that thick, finger-licking glaze.

Step-by-Step Instructions with Pro Explanations
Step 1: Prep Your Ribs Start by removing the membrane from the back of the ribs. Slide a butter knife under the membrane at one end to loosen it, then grab it with a paper towel and pull firmly. It should come off in one piece. This step is crucial for tender ribs that absorb maximum flavor.
Step 2: Create and Apply Your Rub Mix all your dry spices in a bowl until well combined. The mixture should look uniform in color and smell absolutely incredible. Apply the rub generously to both sides of the ribs, pressing it into the meat to ensure it adheres. Don’t be shy here – you want full coverage. Let the rubbed ribs sit at room temperature for 30 minutes, allowing the salt to begin penetrating the meat.
Step 3: The Low and Slow Cook Preheat your oven to 275°F. Place the ribs meat-side up on a large sheet of heavy-duty aluminum foil. Wrap them tightly, creating a sealed packet. Place on a baking sheet and cook for 2.5 to 3 hours. The ribs are ready when the meat has pulled back from the bones by about ½ inch and the meat is tender when pierced with a fork.
Step 4: Make Your BBQ Sauce While the ribs cook, combine your BBQ sauce ingredients in a saucepan. The apple cider vinegar cuts through the sweetness and adds tang, honey provides glossy sheen and extra sweetness, Worcestershire adds umami depth, and liquid smoke reinforces that authentic BBQ flavor. Simmer for 10 minutes to let the flavors meld.
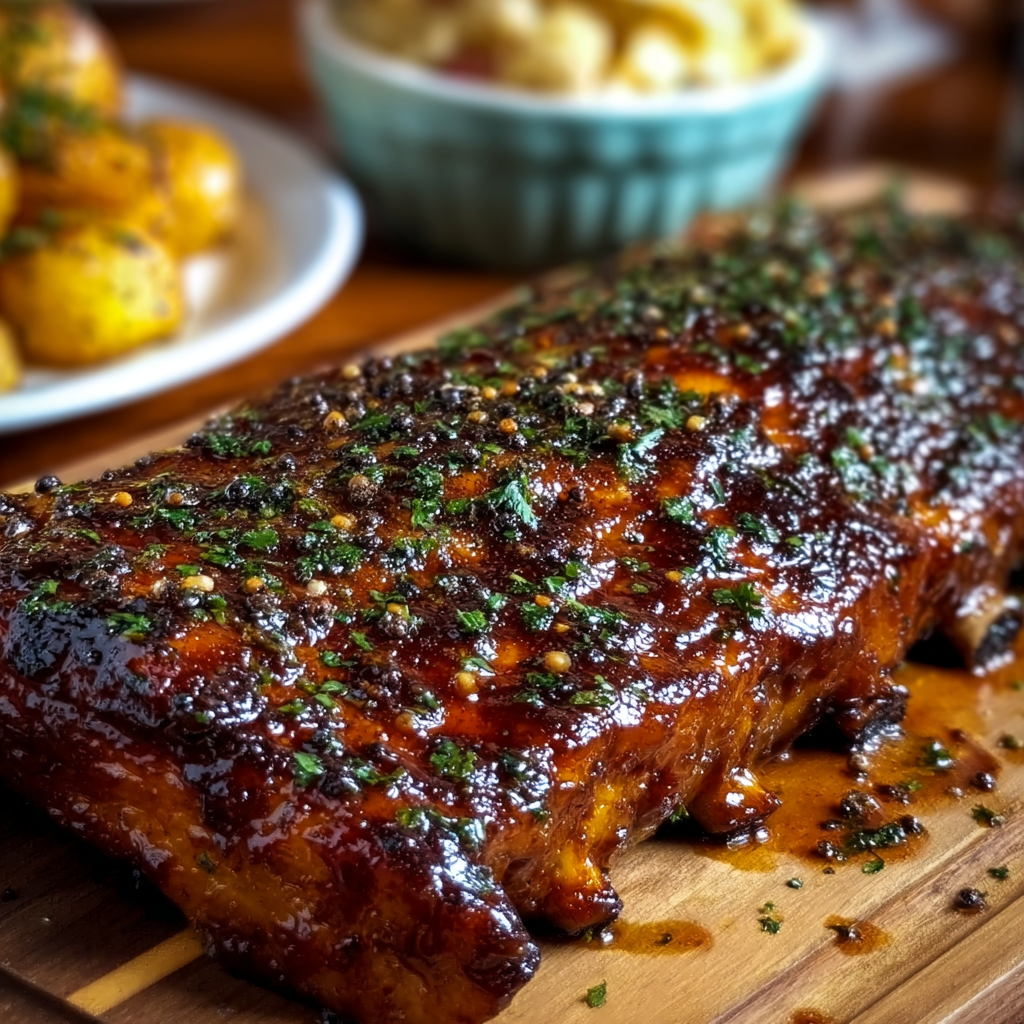
Step 5: The Glaze and Finish Carefully unwrap the ribs (watch out for hot steam!). Brush generously with your BBQ sauce. Increase oven temperature to 350°F and return ribs to the oven, uncovered. Every 10 minutes, brush with another layer of sauce. After 20-30 minutes, the sauce should be caramelized and sticky, with some darker edges.
Step 6: Rest and Serve Let the ribs rest for 10 minutes before cutting. This allows the juices to redistribute throughout the meat. Cut between the bones into individual ribs or serve as sections. Garnish with fresh chopped parsley for a pop of color and freshness.
Pro Tips for BBQ Perfection
Temperature matters more than time. Invest in a good meat thermometer. Your ribs are done when they reach an internal temperature of 190-205°F – this is when collagen has fully broken down.
Don’t skip the resting period after applying the rub. This allows the salt to penetrate the meat, enhancing flavor throughout rather than just on the surface.
Layer your sauce gradually rather than dumping it all on at once. Multiple thin layers create better caramelization and a more complex flavor than one thick coating.
Save some sauce for serving. While the caramelized sauce on the ribs is incredible, having extra sauce on the side lets people customize their experience.
Watch during the final glazing phase. The line between perfectly caramelized and burnt is thin. If you see the sauce starting to blacken rather than brown, reduce your oven temperature slightly.
Customization Ideas
Spice level adjustments: Reduce or omit cayenne for milder ribs. For heat lovers, add chipotle powder or increase cayenne to 2 teaspoons.
Sweetness variations: Substitute maple syrup for honey, or add a tablespoon of molasses to the sauce for deeper, more complex sweetness.
Regional BBQ styles: For Kansas City style, add more molasses and tomato paste. For Carolina style, use a vinegar-based sauce with less sweetness. For Memphis dry ribs, skip the sauce entirely and add more rub.
Herb variations: Fresh thyme sprigs placed on the ribs during the foil-wrapped phase add incredible aromatics. Rosemary and sage also work beautifully with pork.
Smoking alternatives: If you have a smoker, cook at 225°F for 4-5 hours, spritzing with apple juice every hour. For grill, use indirect heat and add wood chips for smoke.
Storage and Meal Prep Tips
Refrigeration: Cooked ribs keep for 3-4 days in an airtight container in the refrigerator. Let them cool completely before storing to prevent condensation.
Freezing: Wrap individual rib portions tightly in plastic wrap, then aluminum foil. They’ll keep for up to 3 months in the freezer. Thaw overnight in the refrigerator.
Reheating: The best method is low and slow again – wrap in foil and reheat at 250°F for about 30 minutes. You can also reheat on a grill over indirect heat, brushing with additional sauce.
Make-ahead strategy: Apply the rub up to 24 hours in advance for even deeper flavor penetration. You can also fully cook the ribs, then do the final glazing phase just before serving.
Nutritional Benefits
While BBQ ribs are definitely an indulgence, pork ribs do offer nutritional value. They’re an excellent source of high-quality protein, providing all essential amino acids your body needs. Ribs are rich in B vitamins, particularly B12 and niacin, which support energy metabolism and nervous system function.
The herbs in the rub aren’t just for flavor – paprika contains antioxidants and vitamin A, while garlic powder offers cardiovascular benefits. Using a homemade rub also means you control the sodium content, unlike many commercial rubs that are loaded with excess salt.
Portion control is key. A reasonable serving is 3-4 ribs, which provides about 30-40 grams of protein. Pair with healthy sides like coleslaw (vinegar-based, not mayo-heavy) and roasted vegetables to create a more balanced meal.
Perfect Side Dishes
Classic BBQ sides that complement these ribs include creamy coleslaw with a tangy dressing that cuts through the richness, roasted or grilled corn on the cob with herb butter, crispy potato wedges seasoned with similar spices as your rub, and baked beans with bacon and molasses.
Lighter options include a fresh cucumber and tomato salad with vinaigrette, grilled vegetable skewers, watermelon and feta salad, or a crisp green salad with citrus dressing.
Starch options: Mac and cheese is classic for a reason, but also consider cornbread with honey butter, garlic bread, or even creamy polenta.

Why This Recipe Works
The science behind these perfect ribs comes down to controlled collagen breakdown. Ribs contain significant connective tissue that’s tough when raw. Cooking low and slow at the right temperature (between 225-275°F) gives enzymes time to break down collagen into gelatin, creating that tender, succulent texture.
The foil wrap creates a braising environment, trapping moisture and creating steam that helps tenderize the meat faster than dry heat alone. It’s essentially a combination of roasting and steaming.
Sugar in the rub and sauce caramelizes through the Maillard reaction, creating hundreds of new flavor compounds and that gorgeous mahogany color. This reaction only happens at higher temperatures, which is why the final uncovered phase at 350°F is so important.
The balance of sweet, savory, tangy, and smoky hits all the major taste receptors, creating a complex, satisfying flavor profile that keeps you coming back for more.
Conclusion
These smoky BBQ ribs represent everything great BBQ should be: tender meat that pulls cleanly from the bone, a perfectly balanced spice rub that penetrates deep, and a sticky, caramelized glaze that makes you lick your fingers without shame. Whether you’re a BBQ novice or a seasoned pitmaster, this recipe delivers consistent, crowd-pleasing results.
The beauty of this recipe is its flexibility. Make it in your oven on a rainy Tuesday or on your smoker for a weekend celebration. Adjust the spice levels to suit your family’s preferences. The techniques you learn here will serve you well for all your future BBQ adventures.
So fire up that oven (or smoker, or grill), get your hands messy, and prepare to serve the most memorable ribs your guests have ever tasted. Don’t forget plenty of napkins – you’re going to need them!


