

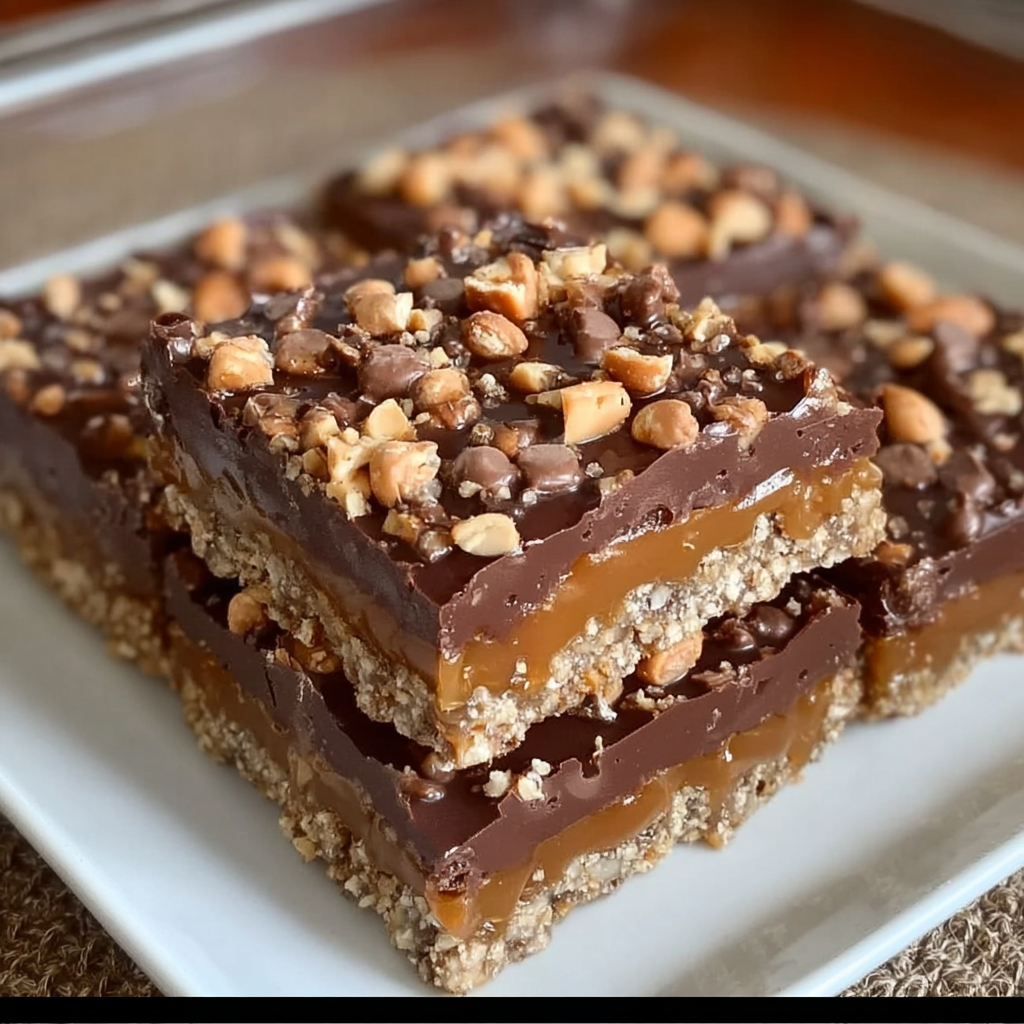
If you’re searching for a show-stopping dessert that requires minimal effort but delivers maximum flavor, these Caramel Chocolate Crunch Bars are your answer. Featuring a crispy peanut butter base, a layer of smooth caramel, rich chocolate ganache, and a crunchy peanut topping, these bars are the perfect combination of sweet, salty, and satisfying. They’re reminiscent of popular candy bars but homemade versions are infinitely better—and surprisingly easy to make.
These no-bake bars are perfect for any occasion, from casual family gatherings to elegant dinner parties. The layers look impressive when sliced, revealing the beautiful contrast between the golden shortbread-like base, glossy caramel center, and dark chocolate top studded with crunchy peanuts. Best of all, they require no oven time and can be made ahead, making them the ideal dessert for busy hosts or anyone who wants to impress without stress.
Why You’ll Love This Recipe
No baking required – These bars come together without turning on your oven, making them perfect for hot summer days or when your oven is occupied with other dishes.
Candy bar vibes at home – If you love Snickers, Reese’s, or other chocolate-peanut-caramel combinations, these bars deliver similar satisfaction with better quality ingredients and customizable sweetness levels.
Make-ahead friendly – These bars actually improve after sitting in the refrigerator overnight as the layers set and the flavors meld. Make them a day or two before you need them.
Crowd-pleasing combination – The sweet-salty balance of chocolate, caramel, and peanuts is universally beloved. Even picky eaters tend to love these bars.
Customizable layers – Once you master the basic technique, you can swap ingredients to create different flavor combinations based on preferences or dietary needs.
Gift-worthy presentation – These bars look bakery-quality when cut into neat squares and arranged on a platter or packaged in a gift box. They make excellent holiday gifts or bake sale items.
Texture paradise – The contrast between the crunchy base and topping, smooth caramel, and creamy chocolate creates an incredibly satisfying eating experience.
Understanding the Ingredients
The Crunchy Base
The foundation of these bars typically consists of crushed graham crackers or cookies mixed with melted butter and often peanut butter. This creates a sturdy, slightly crumbly base similar to a no-bake cheesecake crust. The peanut butter not only adds flavor but also acts as a binding agent that helps the crust hold together when you slice the bars.
Some recipes use crushed vanilla wafers, digestive biscuits, or even pretzels for the base. The key is choosing something with enough structure to support the layers above while providing that essential crunch. The butter ensures the crumbs stick together, while a pinch of salt enhances all the sweet layers to come.
The Caramel Layer
The caramel layer is what takes these bars from good to extraordinary. You have several options for the caramel component:
Homemade caramel – Made by heating sugar until it melts and caramelizes, then adding butter and cream. This provides the most control over sweetness and consistency but requires careful attention to prevent burning.
Caramel sauce – Store-bought or homemade caramel sauce can be thickened slightly and poured over the base. Look for thick, quality caramel sauce rather than thin ice cream topping.
Dulce de leche – This caramelized condensed milk product works beautifully and is often easier to work with than traditional caramel. It’s thick enough to spread and provides authentic caramel flavor with minimal effort.
Caramel bits or squares – Melted caramel candies combined with a bit of cream create a smooth, spreadable layer. This is the most foolproof method for beginners.
The caramel provides sweetness, richness, and that addictive chewy-sticky texture that contrasts so perfectly with the crunchy elements.
The Chocolate Layer
Chocolate ganache is the most elegant topping for these bars. Made by pouring hot cream over chopped chocolate and stirring until smooth, ganache creates a glossy, professional-looking finish that sets to a firm but not rock-hard consistency.
Use semi-sweet or dark chocolate for the best flavor balance—the slight bitterness cuts through the sweet caramel and prevents the bars from being cloying. Milk chocolate creates a sweeter result that some prefer, especially for kids.
Chocolate chips also work, though bar chocolate typically melts more smoothly. If using chips, add a tablespoon of butter to the melted mixture for better consistency and shine.
The Crunchy Topping
Chopped peanuts are the classic topping choice, providing salty crunch that balances all the sweetness. Roasted, salted peanuts work best. You can chop them roughly for varied texture or finely for more even distribution.
Alternative toppings include chopped almonds, pecans, walnuts, toffee bits, crushed pretzels, sea salt flakes, or even crushed cookies. The topping not only adds flavor and texture but also makes the bars look more finished and professional.
Step-by-Step Instructions with Chef’s Tips
Preparing Your Pan
Start by lining an 8×8 or 9×9-inch square baking pan with parchment paper, leaving an overhang on two opposite sides. This overhang creates “handles” that make removing the entire slab of bars incredibly easy once they’re set. Pro tip: Lightly spray the pan before adding parchment—this helps the paper stay in place as you press in the base layer.
For thinner bars, use a 9×13-inch pan. For thicker, more decadent bars, stick with the smaller 8×8 or 9×9-inch size.
Making the Crunchy Base
In a food processor, pulse your graham crackers or cookies until they form fine crumbs. You want the texture of sand—no large chunks that will make the base uneven. If you don’t have a food processor, place the crackers in a sealed plastic bag and crush them with a rolling pin.
Transfer the crumbs to a bowl and add melted butter and peanut butter (if using). Stir with a fork until the mixture resembles wet sand and holds together when squeezed. Test the consistency: grab a handful and squeeze—it should clump together. If it’s too dry and crumbly, add a bit more melted butter.
Pour this mixture into your prepared pan and press it firmly into an even layer using the bottom of a measuring cup or glass. You want it compact and level so it provides a sturdy foundation. Don’t skip the pressing step—a loosely packed base will crumble when you try to cut the bars.
Place the pan in the refrigerator while you prepare the next layer. Chilling helps the base firm up so the caramel layer won’t sink in or mix with the crumbs.
Creating the Caramel Layer
If making homemade caramel, combine sugar and water in a saucepan over medium heat. Don’t stir—just swirl the pan occasionally as the sugar dissolves and begins to turn amber. Once it reaches a deep golden color, remove from heat and carefully whisk in butter and heavy cream. The mixture will bubble vigorously, so be cautious. Return to low heat briefly if needed to smooth it out, then let it cool for 10 minutes before pouring over the base.
If using store-bought caramel or dulce de leche, you may need to warm it slightly to make it spreadable. Heat gently in the microwave in 15-second intervals, stirring between each, until it reaches a thick but pourable consistency.
Pour or spread the caramel over your chilled base layer, working quickly before it starts to set. Use an offset spatula to spread it evenly to the edges. Chef’s secret: If your caramel is too thick to spread smoothly, warm your spatula under hot water, dry it quickly, and use it to smooth the caramel.
Return the pan to the refrigerator for at least 30 minutes to let the caramel set before adding the chocolate layer. This prevents the layers from mixing together.
Preparing the Chocolate Ganache
For a classic ganache, heat heavy cream until it just begins to simmer—you’ll see tiny bubbles around the edges. Don’t let it boil. Pour the hot cream over chopped chocolate in a heat-safe bowl and let it sit undisturbed for 2-3 minutes. This allows the chocolate to soften.
After waiting, stir slowly from the center outward until the chocolate is completely melted and the mixture is smooth and glossy. Patience is key here—stirring too vigorously or too soon can create a grainy texture or incorporate air bubbles.
Let the ganache cool for about 10 minutes until it’s still pourable but has thickened slightly. If it’s too hot, it might melt the caramel layer beneath it.
Assembling the Final Layer
Pour the chocolate ganache over the set caramel layer, starting in the center and letting it flow naturally toward the edges. Use an offset spatula to spread it evenly if needed, but try to minimize manipulation to maintain that glossy finish.
Immediately sprinkle your chopped peanuts or chosen topping over the chocolate while it’s still wet. Timing matters—if you wait too long, the chocolate will start to set and the toppings won’t adhere properly. Press them gently into the surface with your hand or the back of a spoon.
The Setting Process
Refrigerate the assembled bars for at least 3-4 hours, or preferably overnight. Overnight chilling is ideal because it allows all the layers to firm up completely and makes cutting much cleaner and easier.
If you’re in a hurry, you can place them in the freezer for 1-2 hours, but refrigeration produces better texture in the final product—the chocolate sets to the perfect firmness rather than becoming too hard.
Cutting Perfect Bars
When ready to cut, use the parchment paper handles to lift the entire slab out of the pan and place it on a cutting board. Have a large, sharp knife ready along with a tall glass of very hot water and paper towels.
Before each cut, dip the knife in the hot water, wipe it dry on the paper towel, and then make one swift, clean cut. Don’t saw back and forth—press straight down firmly and smoothly. Repeat the heating and wiping process before each cut. This technique ensures clean edges where you can see all the beautiful layers.
Cut the slab into squares or rectangles of your preferred size. Smaller 1-inch squares are perfect for parties where guests want a small sweet bite, while 2-inch squares make a more substantial dessert portion.
Pro Tips and Tricks
Use quality chocolate – The chocolate layer is prominent, so using good chocolate makes a noticeable difference. Ghirardelli, Guittard, or Valrhona are excellent choices.
Salt is essential – Don’t skip the salt in the base layer or the salted peanuts on top. The salt-sweet contrast is what makes these bars addictive.
Temperature matters – Make sure each layer is properly chilled before adding the next. This prevents the layers from bleeding into each other.
Freeze for cleaner cuts – If your bars are becoming messy to cut, pop them in the freezer for 15-20 minutes to firm up, then cut quickly while they’re very cold.
Room temperature serving – While these need to be stored cold, they taste best at cool room temperature. Remove from the fridge 10-15 minutes before serving for the best texture.
Use parchment paper – This is non-negotiable. Trying to cut and remove these bars without parchment paper lining will end in frustration and broken bars.
Add a pinch of sea salt – For a gourmet touch, sprinkle flaky sea salt over the chocolate layer along with the peanuts. The large salt crystals add texture and enhance flavor.
Customization Ideas
Peanut butter lovers – Add a thin layer of peanut butter spread over the caramel layer before adding the chocolate for an extra peanut butter punch.
Nutella variation – Replace the peanut butter in the base with Nutella and use chopped hazelnuts on top for a Ferrero Rocher-inspired treat.
Almond joy version – Use almonds instead of peanuts, add shredded coconut to the base layer, and use dark chocolate for the topping.
Gluten-free option – Use gluten-free graham crackers or crushed gluten-free cookies for the base. Everything else is naturally gluten-free.
Vegan adaptation – Use vegan butter, coconut cream instead of dairy cream, and dairy-free chocolate. The texture will be slightly different but still delicious.
Pretzel twist – Replace half the cookie crumbs with crushed pretzels for extra saltiness and crunch throughout the base.
White chocolate drizzle – After the bars are set, melt white chocolate and drizzle it over the top in a zigzag pattern for visual interest.
Coffee enhancement – Add a teaspoon of instant espresso powder to the chocolate ganache for a sophisticated mocha flavor.
Storage and Serving Tips
Refrigerator storage: Store the bars in an airtight container in the refrigerator for up to one week. Place parchment or wax paper between layers if stacking to prevent them from sticking together.
Freezer instructions: These bars freeze exceptionally well. Wrap individual bars in plastic wrap, then place them in a freezer bag or airtight container. Freeze for up to 3 months. Thaw in the refrigerator overnight or at room temperature for 30 minutes before serving.
Make-ahead for parties: These are an ideal make-ahead dessert. Prepare them 2-3 days before your event and keep refrigerated. Cut them the day of or even the day before—they hold up beautifully.
Serving temperature: Remove from refrigerator 10-15 minutes before serving. They should be cool but not rock-hard. If they’re too cold, the caramel will be too firm to bite through easily.
Presentation ideas: Arrange on a platter with parchment paper squares between layers for easy grabbing. Dust with cocoa powder or add a small dollop of whipped cream on each bar for an elegant presentation.

Why This Recipe Works
These bars succeed because of the perfect textural contrast. The crunchy base and topping frame the smooth, chewy caramel and creamy chocolate, creating a multi-sensory experience in every bite.
The layering technique isn’t just for looks—it’s functional. Each layer serves a purpose: the base provides structure, the caramel adds chewiness and sweetness, and the chocolate creates a smooth, rich finish that brings everything together.
The no-bake method eliminates the risk of overbaking or underbaking. Temperature control happens in your refrigerator, not your oven, making the process more forgiving and reliable.
The sweet-salty balance from salted peanuts and sea salt prevents the bars from being one-dimensionally sweet. This balance keeps you wanting another bite and makes them satisfying rather than cloying.
Nutritional Considerations
Let’s be honest—these are indulgent treats meant for special occasions, not everyday health food. However, they do contain some beneficial ingredients. Peanuts provide protein, healthy fats, and fiber. Dark chocolate contains antioxidants and minerals like iron and magnesium.
To make them slightly more nutritious without sacrificing too much flavor, you can use dark chocolate (70% cacao or higher), reduce the sugar in the caramel layer, use natural peanut butter, or add seeds like chia or flax to the base for extra fiber and omega-3s.
Portion control is key with rich desserts like this. Cutting smaller bars helps everyone enjoy the treat without overdoing it.
Conclusion
Caramel Chocolate Crunch Bars are proof that impressive desserts don’t require complicated techniques or hours of active time. With simple layering, quality ingredients, and patience while they set, you create a confection that looks and tastes like it came from an expensive candy shop.
These bars hit every note: sweet, salty, crunchy, smooth, rich, and satisfying. They’re perfect for potlucks because they travel well, ideal for gifts because they look professional, and excellent for meal prep because they last all week in the fridge. Once you master this basic version, the flavor possibilities are endless.
Whether you call them caramel chocolate crunch bars, millionaire bars, or homemade candy bars, one thing is certain: they’ll disappear fast wherever you serve them. The combination of textures and flavors is simply irresistible, and the fact that you made them yourself makes them even more special. Make a batch this weekend and watch them become your new go-to dessert for any occasion that calls for something sweet and spectacular.


