

Imagine combining two beloved comfort foods—creamy mac and cheese and savory seasoned ground beef—wrapped in a golden, crispy tortilla. These Mac and Cheese Ground Beef Wraps are the ultimate indulgent meal that’s surprisingly easy to make. Perfect for busy weeknights, game day gatherings, or whenever you’re craving something deliciously satisfying, these wraps deliver big flavor in every bite.
What Makes These Wraps Irresistible?
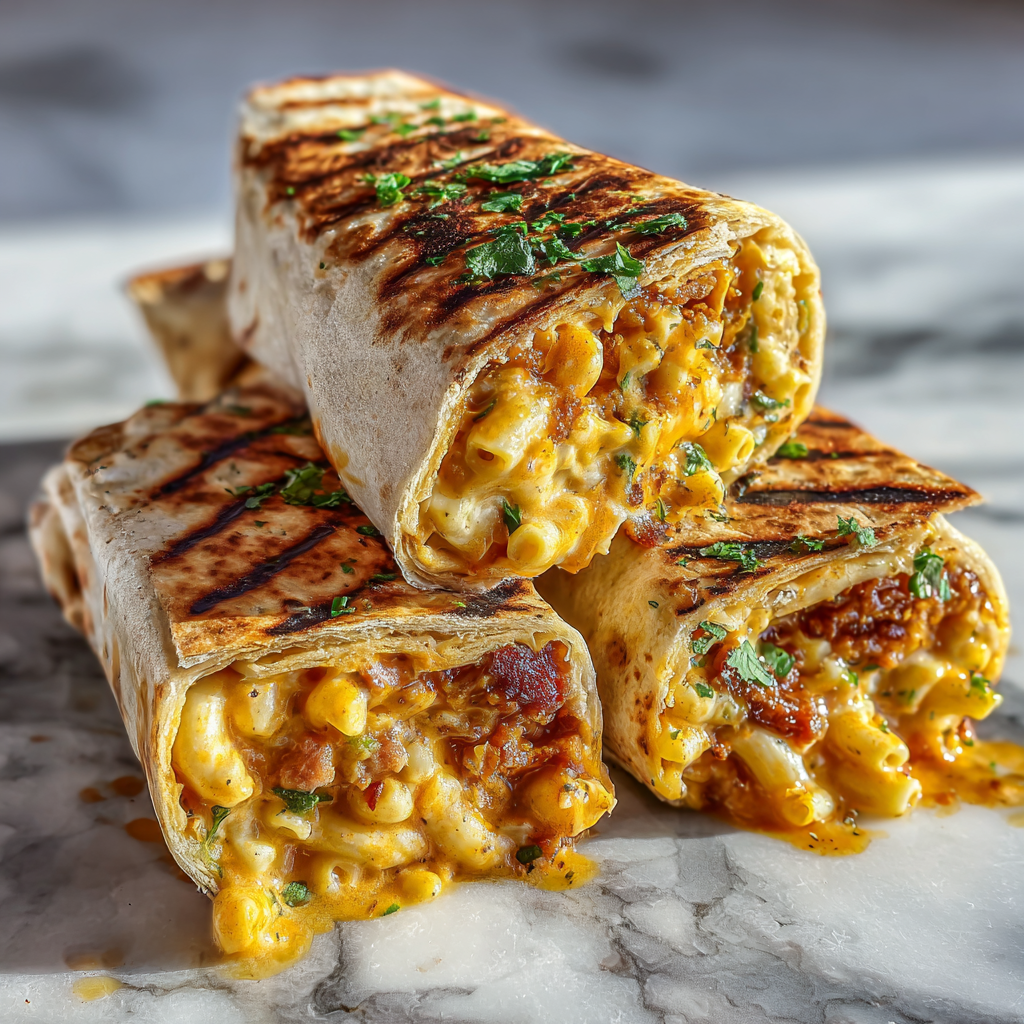
The genius of this recipe lies in its simplicity and the perfect marriage of textures and flavors. Creamy, cheesy macaroni meets well-seasoned ground beef, all encased in a grilled tortilla that’s crispy on the outside and melty on the inside. The result? A handheld meal that’s messy in the best way possible, with cheese stretching with every bite.
Ingredients You’ll Need
For the Ground Beef:
- 1 lb ground beef (80/20 blend for best flavor)
- 1 small onion, finely diced
- 3 garlic cloves, minced
- 1 tablespoon taco seasoning
- 1 teaspoon chili powder
- ½ teaspoon cumin
- ½ teaspoon paprika
- ½ teaspoon garlic powder
- ½ teaspoon onion powder
- Salt and black pepper to taste
- 2 tablespoons tomato paste
- ¼ cup water or beef broth
For the Mac and Cheese:
- 8 oz elbow macaroni (about 2 cups dry)
- 3 tablespoons unsalted butter
- 3 tablespoons all-purpose flour
- 2 cups whole milk, warmed
- 2 cups sharp cheddar cheese, shredded
- 1 cup mozzarella cheese, shredded
- ½ cup cream cheese, softened
- 1 teaspoon Dijon mustard
- ½ teaspoon garlic powder
- ¼ teaspoon cayenne pepper (optional)
- Salt and black pepper to taste
For Assembly:
- 6 large flour tortillas (10-12 inch burrito size)
- 2 cups additional shredded cheddar cheese (for inside wraps)
- 3-4 tablespoons butter, melted (for grilling)
- Optional toppings: sour cream, salsa, hot sauce, chopped green onions, cilantro
Step-by-Step Instructions
Step 1: Cook the Macaroni
- Bring a large pot of salted water to a boil.
- Add elbow macaroni and cook according to package directions until al dente (usually 7-8 minutes).
- Drain and set aside. Do not rinse—the starch helps the cheese sauce cling to the pasta.
Step 2: Prepare the Ground Beef
- Heat a large skillet over medium-high heat.
- Add ground beef, breaking it up with a wooden spoon or spatula.
- Cook for 5-6 minutes until the beef is browned and no longer pink.
- Add diced onion and cook for 3-4 minutes until softened.
- Add minced garlic and cook for 30 seconds until fragrant.
- Stir in taco seasoning, chili powder, cumin, paprika, garlic powder, and onion powder.
- Add tomato paste and water or beef broth, stirring to combine.
- Simmer for 3-4 minutes until the mixture thickens slightly.
- Season with salt and pepper to taste.
- Transfer to a bowl and set aside. Wipe the skillet clean for later use.
Step 3: Make the Cheese Sauce
- In a large saucepan, melt butter over medium heat.
- Add flour and whisk constantly for 1-2 minutes to create a roux. It should be golden and smell slightly nutty.
- Gradually pour in the warm milk while whisking continuously to prevent lumps.
- Continue whisking and cooking for 4-5 minutes until the sauce thickens enough to coat the back of a spoon.
- Reduce heat to low and add shredded cheddar, mozzarella, and cream cheese.
- Stir until all cheese is melted and the sauce is smooth.
- Add Dijon mustard, garlic powder, and cayenne pepper if using.
- Season with salt and black pepper to taste.
- Remove from heat and immediately add the cooked macaroni, stirring until well coated.
Step 4: Combine Beef and Mac and Cheese
- Add half of the seasoned ground beef to the mac and cheese, folding gently to combine.
- Reserve the other half of the beef for layering in the wraps.
- The mixture should be creamy and well-combined but not overly mixed.
Step 5: Assemble the Wraps
- Lay a tortilla flat on a clean work surface.
- Spoon about ¾ to 1 cup of the mac and cheese mixture in a line down the center, leaving 2 inches on each end.
- Top with a generous portion of the reserved ground beef.
- Sprinkle with about ⅓ cup additional shredded cheddar cheese.
- Fold in the sides of the tortilla, then roll tightly from the bottom up, ensuring the filling is completely enclosed.
- Repeat with remaining tortillas.
Step 6: Grill the Wraps
- Heat a large skillet or griddle over medium heat.
- Brush the outside of each wrap with melted butter.
- Place wraps seam-side down in the skillet (work in batches if needed).
- Cook for 2-3 minutes until golden brown and crispy.
- Carefully flip and cook the other side for another 2-3 minutes.
- Continue turning and pressing gently with a spatula until all sides are golden and the cheese inside is melted.
Step 7: Serve
- Let wraps rest for 2-3 minutes before cutting (this helps them hold together).
- Slice each wrap in half diagonally to show off the beautiful cross-section.
- Serve with sour cream, salsa, hot sauce, or your favorite toppings.

Pro Tips for Perfect Wraps
Don’t Overfill: It’s tempting to pack in as much filling as possible, but overfilled wraps are difficult to roll and will burst during cooking.
Seal Properly: Make sure the seam is tucked tightly and place seam-side down first when grilling to help seal it closed.
Use Room Temperature Tortillas: Cold tortillas crack when folded. Warm them slightly in the microwave (10-15 seconds) if needed.
Low and Slow Grilling: Medium heat ensures the outside gets crispy without burning before the inside is heated through.
Butter is Better: Brushing with melted butter instead of oil gives a richer flavor and better golden color.
Make It Cheesier: Add extra cheese inside for maximum cheese pull when you cut into the wrap.
Let It Cool Slightly: The filling is very hot right after cooking. A brief rest makes them easier to handle and prevents burned tongues!
Nutritional Information (Per Wrap)
- Calories: 720
- Total Fat: 38g
- Saturated Fat: 20g
- Cholesterol: 110mg
- Sodium: 1,240mg
- Total Carbohydrates: 58g
- Dietary Fiber: 3g
- Sugars: 6g
- Protein: 35g
Nutritional values are approximate and based on one wrap from a recipe yielding 6 servings.
Storage and Reheating
Refrigerator: Store assembled but ungrilled wraps wrapped individually in plastic wrap or foil for up to 2 days. Grill when ready to eat. Cooked wraps can be refrigerated for up to 3 days.
Freezing: Wrap each assembled (ungrilled) wrap tightly in plastic wrap, then aluminum foil. Freeze for up to 2 months. Thaw in the refrigerator overnight before grilling.
Reheating Grilled Wraps:
- Oven: Wrap in foil and heat at 350°F for 15-20 minutes
- Skillet: Heat over medium-low, flipping occasionally, until warmed through
- Air Fryer: 350°F for 5-7 minutes, flipping halfway
Microwave: Works in a pinch but the tortilla won’t be crispy. Wrap in a damp paper towel and heat in 30-second intervals.
Delicious Variations
Bacon Mac and Cheese Wraps
Add ½ cup crumbled crispy bacon to the mac and cheese mixture for extra smoky flavor.
Buffalo Chicken Mac Wraps
Replace ground beef with shredded rotisserie chicken tossed in buffalo sauce. Add blue cheese crumbles.
Jalapeño Popper Mac Wraps
Mix in diced jalapeños and add cream cheese to the filling. Top with crushed tortilla chips before rolling.
BBQ Pulled Pork Mac Wraps
Use pulled pork instead of ground beef and drizzle with your favorite BBQ sauce.
Vegetarian Version
Replace ground beef with black beans, corn, and diced bell peppers seasoned with taco spices.
Loaded Taco Mac Wraps
Add diced tomatoes, lettuce, and a drizzle of taco sauce. Top with crushed Doritos for extra crunch.
Pizza Mac Wraps
Use Italian sausage instead of ground beef, add pizza sauce, pepperoni, and mozzarella cheese.
Spicy Chipotle Mac Wraps
Add chipotle peppers in adobo sauce to the ground beef and cheese sauce for a smoky, spicy kick.
Perfect Side Dishes
Fresh and Light Sides (to balance the richness):
- Simple green salad with vinaigrette
- Coleslaw
- Cucumber and tomato salad
- Corn salad with lime and cilantro
- Pickled jalapeños
Additional Comfort Sides:
- Sweet potato fries
- Onion rings
- Loaded potato wedges
- Mexican street corn
Dipping Sauces:
- Sour cream
- Salsa verde
- Chipotle mayo
- Ranch dressing
- Queso dip
- Guacamole
Meal Prep and Make-Ahead Tips
Prepare Components Separately: Cook the mac and cheese and ground beef up to 2 days ahead. Store separately in the refrigerator and assemble wraps when ready to cook.
Batch Cooking: Double or triple the recipe and freeze uncooked wraps for quick future meals.
Lunch Prep: These wraps are excellent for meal prep. Grill them all at once, portion into containers, and reheat throughout the week.
Party-Ready: Cut grilled wraps into 1-inch pinwheels for easy party appetizers.
Serving Suggestions for Different Occasions
Game Day Spread: Arrange cut wraps on a platter with various dipping sauces and serve alongside chicken wings and nachos.
Family Dinner: Serve whole wraps with a side salad and corn on the cob for a complete meal.
Kids’ Lunch: These wraps are kid-friendly and easy to eat. Cut into smaller portions for little hands.
Late-Night Snack: Perfect for satisfying those midnight cravings!
Potluck Contribution: Transport ungrilled wraps in a cooler and grill on-site, or bring fully cooked and reheat.
Frequently Asked Questions
Can I use a different type of pasta?
Yes! While elbow macaroni is traditional, shells, cavatappi, or any short pasta shape works well. Avoid long pasta like spaghetti as it’s difficult to wrap.
What if my cheese sauce is too thick?
Add a splash of milk and stir over low heat until you reach the desired consistency. The sauce should be creamy, not stiff.
Can I use pre-made mac and cheese?
Absolutely! Store-bought or leftover mac and cheese works great. You’ll need about 4 cups total.
My wraps keep breaking when I roll them. Help!
Warm the tortillas first, don’t overfill, and make sure to fold in the sides before rolling. Practice makes perfect!
Can I make these in an air fryer?
Yes! Brush wraps with butter and air fry at 375°F for 8-10 minutes, flipping halfway through.
What’s the best type of ground beef to use?
80/20 ground beef (80% lean) provides the best flavor and moisture. Leaner beef can be dry.
Can I make these gluten-free?
Use gluten-free pasta and tortillas, and substitute the flour in the cheese sauce with cornstarch or a gluten-free flour blend.
How do I prevent the filling from spilling out?
Don’t overfill, seal the wraps tightly, and place seam-side down first when cooking. Press gently while grilling to help seal.
Can I add vegetables?
Yes! Diced bell peppers, corn, or black beans are great additions. Sauté vegetables with the ground beef.
Why isn’t my cheese stretching?
Use freshly shredded cheese (pre-shredded contains anti-caking agents that prevent proper melting) and make sure the filling is hot when assembled.
Why This Recipe Works
The combination of carbs, protein, cheese, and crispy tortilla hits all the comfort food notes. The mac and cheese provides creaminess, the seasoned beef adds savory depth and substance, and the grilled tortilla exterior gives textural contrast that elevates this beyond a simple burrito.
The cheese sauce made from scratch ensures proper melting and cheese pull, while the seasoned ground beef adds complexity that plain hamburger wouldn’t provide. Grilling the wraps creates that irresistible golden crust that keeps everything together and adds a satisfying crunch.
The Ultimate Comfort Food Experience
There’s something inherently joyful about comfort food mashups, and these Mac and Cheese Ground Beef Wraps represent the pinnacle of comfort cuisine. They’re indulgent without being fussy, impressive without being complicated, and most importantly, they taste absolutely incredible.
Whether you’re feeding hungry teenagers, hosting a casual gathering, or simply treating yourself to something special, these wraps deliver satisfaction in every cheesy, meaty, crispy bite.
Conclusion
Mac and Cheese Ground Beef Wraps prove that sometimes the best recipes come from combining classic favorites in new and exciting ways. With their golden, crispy exterior and oozy, cheesy interior packed with seasoned beef, these wraps are destined to become a household favorite.
The best part? They’re surprisingly easy to make, incredibly customizable, and absolutely delicious. Once you master the basic technique, you can experiment with different proteins, cheeses, and seasonings to create your own signature version.


