
Silky cheesecake, custard notes, and rich chocolate ganache create a memorable sweet American indulgence.
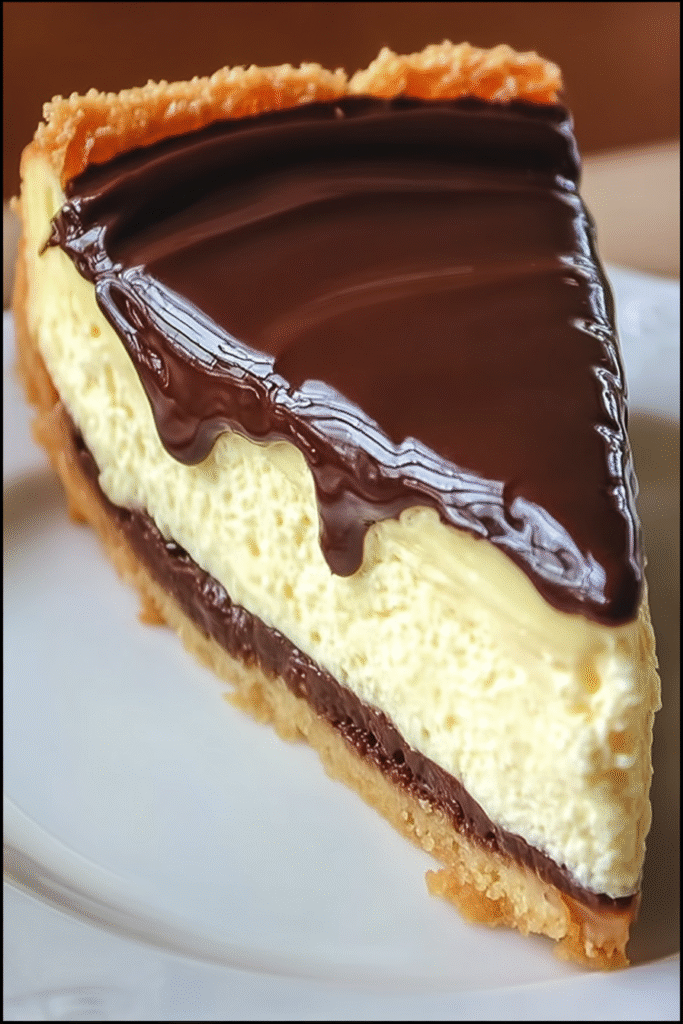
This Boston cream pie cheesecake is the ultimate mashup of two iconic American desserts, combining the creamy richness of New York-style cheesecake with the classic vanilla-chocolate combination of Boston cream pie. A buttery graham cracker crust gets an unexpected layer of dark chocolate, then holds a velvety, custard-scented cheesecake filling that’s simultaneously light and luxurious. The crowning glory is a glossy chocolate ganache that cascades over the top, creating that signature Boston cream pie finish. Every slice reveals beautiful layers – golden crust, chocolate stripe, ivory cheesecake, and dark chocolate cap – delivering textural contrast and flavor harmony that makes this dessert unforgettable. This is the kind of showstopper that transforms any gathering into a special occasion.
Why You’ll Love This Boston Cream Pie Cheesecake
- Best of both worlds – Combines two beloved American desserts into one spectacular creation that honors both traditions while creating something entirely new
- Stunning visual impact – The distinct layers create dramatic presentation when sliced, with the chocolate stripe providing unexpected visual interest
- Rich yet balanced – Despite its decadence, the combination of tangy cream cheese, sweet vanilla, and dark chocolate creates sophisticated balance
- Special occasion worthy – Impressive enough for holidays, birthdays, or celebrations yet accessible enough for confident home bakers
- Make-ahead convenience – Actually improves overnight as flavors meld and textures set, making it perfect for entertaining without last-minute stress
- Creamy perfection – The addition of sour cream and heavy cream creates ultra-smooth, luxurious texture that melts on the tongue
- Classic flavors elevated – Familiar vanilla and chocolate combination gets sophisticated treatment through quality ingredients and careful technique
Ingredients You’ll Need
For the Crust:
- 2 cups graham cracker crumbs (approximately 240g, about 14-16 full crackers) – provides sweet, slightly honey-flavored base with pleasant crunch
- ½ cup unsalted butter, melted (113g) – binds crumbs together and adds rich, buttery flavor
- ½ cup dark chocolate, melted (approximately 85g) – creates signature chocolate layer between crust and filling
For the Cheesecake Filling:
- 3 cups cream cheese, softened (approximately 680g or 24 oz) – the foundation, providing tangy richness and creamy body
- 1 cup granulated sugar (200g) – sweetens and helps create smooth texture
- 3 large eggs, at room temperature – bind ingredients and create structure without making the cheesecake dense
- 2 teaspoons vanilla extract – provides classic custard-like flavor reminiscent of Boston cream pie’s pastry cream
- ½ cup sour cream (120ml) – adds tang and ensures ultra-creamy texture
- ½ cup heavy cream (120ml) – creates silky, luxurious mouthfeel and helps prevent cracking
For the Chocolate Ganache:
- 1½ cups dark chocolate chips (approximately 255g) – creates glossy, rich topping
- ½ cup heavy cream (120ml) – combines with chocolate to create smooth, pourable ganache
Step-by-Step Instructions
Prepare oven and pan Preheat your oven to 165°C (325°F) with the rack positioned in the center. Generously grease a 9-inch (23cm) springform pan with butter or cooking spray, paying special attention to the sides to ensure easy release later. This prevents sticking and facilitates clean removal.
Create the graham cracker base In a medium bowl, combine the graham cracker crumbs with the melted butter, stirring with a fork until the mixture resembles wet sand and all crumbs are evenly moistened. Pour this mixture into the prepared springform pan. Using the bottom of a measuring cup or your fingers, press the crumb mixture firmly and evenly into the bottom of the pan, creating a compact, uniform layer. Ensure the edges are well-pressed to prevent crumbling later.
Add the chocolate layer Melt the dark chocolate in a microwave-safe bowl in 20-30 second intervals, stirring between each, until completely smooth. Pour the melted chocolate over the pressed graham cracker crust and use an offset spatula or back of a spoon to spread it into an even layer, covering the entire crust surface. Refrigerate for 10 minutes until the chocolate sets and becomes firm to the touch. This chocolate barrier prevents the crust from becoming soggy while adding a delicious chocolate surprise.
Prepare the cheesecake filling In a large mixing bowl, beat the softened cream cheese with an electric mixer on medium speed for 2-3 minutes until completely smooth, light, and fluffy with no lumps remaining. Add the granulated sugar and continue beating for another 2 minutes until well incorporated and creamy. Add the eggs one at a time, beating well after each addition and scraping down the bowl sides as needed. The mixture should be smooth after each egg. Mix in the vanilla extract, sour cream, and heavy cream, beating on low speed just until fully combined and silky smooth. Don’t overmix at this stage – excessive mixing incorporates too much air, which can cause cracking.
Pour and bake Pour the cheesecake batter over the chilled chocolate-covered crust in the springform pan, using a spatula to smooth the top into an even layer. Place the springform pan on a baking sheet (to catch any potential drips) and transfer to the preheated oven. Bake for 55-65 minutes. The cheesecake is done when the edges are set and slightly puffed, but the center still jiggles slightly when gently shaken – it should look like barely-set gelatin in the very center. Don’t overbake – the residual heat will continue cooking it.
Cool gradually to prevent cracks Turn off the oven completely but leave the cheesecake inside. Prop the oven door open slightly (about 4 inches) using a wooden spoon. Let the cheesecake cool in this gradually cooling environment for 1 hour. This gentle temperature transition prevents the dramatic temperature change that causes cracks. After the hour, remove the cheesecake from the oven and cool completely to room temperature on a wire rack, approximately 2 additional hours.
Prepare the chocolate ganache In a small saucepan, heat the heavy cream over medium heat, stirring occasionally, until it just begins to simmer around the edges – small bubbles will form. Don’t let it boil. Place the dark chocolate chips in a heatproof bowl. Pour the hot cream over the chocolate chips and let sit undisturbed for 2 minutes – this allows the heat to begin melting the chocolate. After 2 minutes, whisk slowly from the center outward until the mixture is completely smooth, glossy, and homogeneous. If any chocolate chunks remain, microwave in 10-second bursts, stirring between each, until perfectly smooth.
Top with ganache Once the cheesecake has cooled to room temperature, pour the ganache over the center of the cheesecake. Using an offset spatula or the back of a spoon, gently spread the ganache from the center toward the edges, allowing some to naturally drip down the sides if desired for a rustic look, or keeping it perfectly smooth on top for a clean presentation. The ganache should create an even, glossy layer approximately ¼ inch thick.
Chill and set Cover the cheesecake loosely with plastic wrap or aluminum foil (don’t let it touch the ganache surface) and refrigerate for at least 4 hours, but preferably overnight. This extended chilling time allows the ganache to set completely, the flavors to meld beautifully, and the cheesecake to achieve its ideal creamy yet sliceable texture.
Serve with care When ready to serve, run a thin knife around the inside edge of the springform pan to loosen any stuck spots. Release and remove the springform ring. For the cleanest slices, dip a sharp knife in hot water, wipe dry, then slice. Clean and re-dip the knife between each cut for professional-looking portions.
Recipe Notes & Tips
- Room temperature ingredients crucial – Cream cheese, eggs, and sour cream should all be at room temperature for smooth mixing and even texture
- Don’t overmix filling – Once eggs are added, mix just until combined; overmixing incorporates excess air causing cracks
- Water bath optional – This recipe doesn’t require a water bath due to the cream and slow cooling, but you can use one for extra insurance against cracking
- Test for doneness correctly – The center should jiggle slightly like set gelatin; it will firm as it cools
- Chocolate quality matters – Use good-quality dark chocolate for the ganache; cheap chocolate creates grainy, less glossy results
- Gradual cooling essential – The slow oven cooling prevents dramatic temperature changes that cause surface cracks
- Overnight chilling ideal – Though 4 hours is minimum, overnight chilling improves texture and allows flavors to develop fully
- Sharp knife for clean slices – Hot water dipping and wiping between cuts creates professional-looking portions
Nutritional Information
Prep Time: 25 minutes
Baking Time: 65 minutes
Cooling Time: 3 hours + 4 hours minimum chilling
Total Time: Approximately 8 hours (mostly hands-off)
Servings: 12 slices
Calories: 450 calories per slice
Fats: 31g per slice
Carbohydrates: 36g per slice
Proteins: 7g per slice

Perfect Pairings
- Strong coffee or espresso – The bitter notes beautifully balance the rich sweetness and enhance chocolate flavors
- Vanilla ice cream – A small scoop alongside provides temperature and textural contrast
- Fresh berries – Raspberries or strawberries add tart freshness that cuts through the richness
- Whipped cream – A dollop of lightly sweetened whipped cream adds cloud-like lightness
- Port wine or dessert wine – Sweet fortified wines complement the chocolate and vanilla elegantly
- Hot chocolate – For chocolate lovers, doubles down on cocoa flavors in a comforting way
Ideal Occasions
- Special celebrations – Birthdays, anniversaries, or milestone events where an impressive dessert makes the occasion memorable
- Holiday gatherings – Thanksgiving, Christmas, or New Year’s celebrations where showstopper desserts are expected
- Dinner party finale – Impresses guests while allowing advance preparation, freeing you to enjoy your event
- Potluck contributions – Travels well in the springform pan and serves a crowd beautifully
- Mother’s Day or Valentine’s Day – Romantic, indulgent dessert perfect for celebrating loved ones
- Weekend baking projects – Satisfying to make when you have time to enjoy the process
Storage & Serving Tips
- Refrigerator storage – Store covered in refrigerator for up to 5 days; the cheesecake stays fresh and delicious
- Covering technique – Tent aluminum foil over the top without touching the ganache to prevent condensation marks
- Freezing option – Freeze whole or in slices wrapped tightly for up to 2 months; thaw overnight in refrigerator
- Serving temperature – Serve chilled but not ice-cold; remove from refrigerator 20-30 minutes before serving for best flavor
- Slicing technique – Hot water knife dipping between cuts creates clean, professional-looking slices
- Individual portions – Pre-slice and store individually for easy grab-and-go servings
Creative Variations to Try
- White chocolate ganache – Replace dark chocolate with white chocolate for sweeter, milder topping
- Espresso enhancement – Add 1 tablespoon espresso powder to filling for sophisticated mocha variation
- Raspberry swirl – Swirl ¼ cup raspberry preserves through filling before baking for fruity twist
- Caramel drizzle – Drizzle caramel sauce over set ganache for salted caramel variation
- Chocolate crust – Replace graham crackers with chocolate wafer cookies for all-chocolate base
- Vanilla bean upgrade – Replace vanilla extract with seeds from 1 vanilla bean for intense vanilla flavor
- Mini versions – Make in muffin tins lined with cupcake liners for individual servings (adjust baking time to 20-25 minutes)
- No-bake filling – Use no-bake cheesecake filling recipe if you prefer to avoid baking
Troubleshooting Common Issues
- Cracks on surface – Oven too hot, cheesecake overbaked, or cooled too quickly; use oven thermometer and follow gradual cooling method
- Sunken center – Overbaked or temperature too high; bake at lower temperature and remove when center still jiggles
- Grainy texture – Cream cheese wasn’t softened properly or mixture was overmixed; ensure room temperature ingredients
- Soggy crust – Not pressed firmly enough or chocolate layer skipped; press crust firmly and include chocolate barrier
- Ganache won’t set – Too much cream or not chilled long enough; adjust ratio and refrigerate overnight
- Ganache separated – Cream too hot or chocolate overheated; ensure cream just simmers and chocolate melts gently
- Difficult to remove from pan – Sides weren’t greased; always grease springform pan sides well and run knife around edge before releasing
Why This Recipe Works
This Boston cream pie cheesecake succeeds because it applies fundamental cheesecake science while incorporating innovative layering. Softened cream cheese beaten with sugar creates smooth, lump-free base. Room temperature eggs incorporate evenly without creating air pockets that cause cracks. Sour cream adds tanginess and fat, contributing to ultra-creamy texture. Heavy cream increases moisture and richness while helping prevent surface cracking. Vanilla extract provides classic custard notes reminiscent of Boston cream pie’s pastry cream. The moderate oven temperature (165°C) allows gentle, even cooking. The gradual cooling in the turned-off oven prevents dramatic temperature changes that cause cracking. The chocolate layer between crust and filling serves dual purpose – flavor element and moisture barrier preventing soggy crust. Graham cracker crust provides textural contrast and structural foundation. Dark chocolate ganache made from chocolate and cream creates glossy, rich topping that sets firm when chilled through cocoa butter crystallization. Extended refrigeration allows flavors to meld and textures to set perfectly. Each slice contains 450 calories – an indulgent dessert appropriate for special occasions, providing rich satisfaction from quality fats (cream cheese, butter, cream), moderate carbohydrates (sugar, graham crackers), and protein (eggs, cream cheese).
Final Thoughts
This Boston cream pie cheesecake represents the pinnacle of American dessert innovation – honoring two classic traditions while creating something entirely new and spectacular. There’s genuine artistry in how the familiar flavors of vanilla custard and dark chocolate translate into cheesecake form, creating nostalgia and novelty simultaneously. What elevates this from ordinary to exceptional is the attention to proper technique: room temperature ingredients, gentle mixing, gradual cooling, and patient chilling. These aren’t optional refinements – they’re essential steps that transform good cheesecake into great cheesecake. This dessert demonstrates that showstopping results don’t require professional training, just respect for fundamentals and willingness to invest time (mostly hands-off) for spectacular payoff. Whether you’re an experienced baker seeking to impress or confident home cook ready to tackle your first cheesecake, this recipe guides you to success through clear instructions and understanding why each step matters. The beauty lies in its versatility – equally appropriate for intimate dinners and large gatherings, everyday celebrations and milestone events. So gather your ingredients, embrace the process, and prepare to create a dessert that will elicit genuine amazement and requests for seconds. This is the kind of showstopper that becomes your signature dessert, the one people request for special occasions, the recipe you’re proud to share because you know it represents your best work in the kitchen.


