
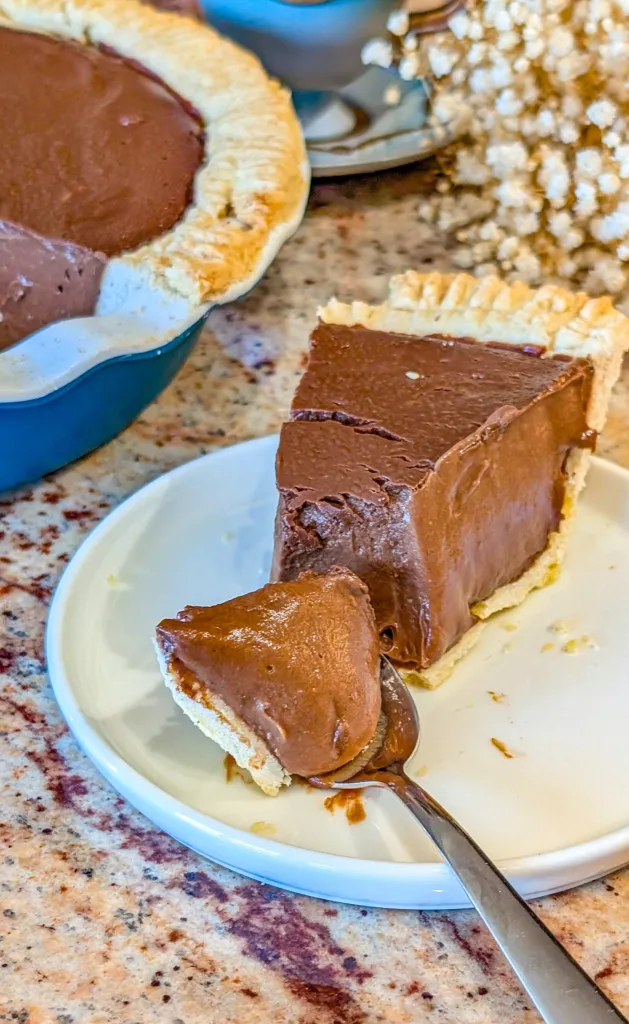
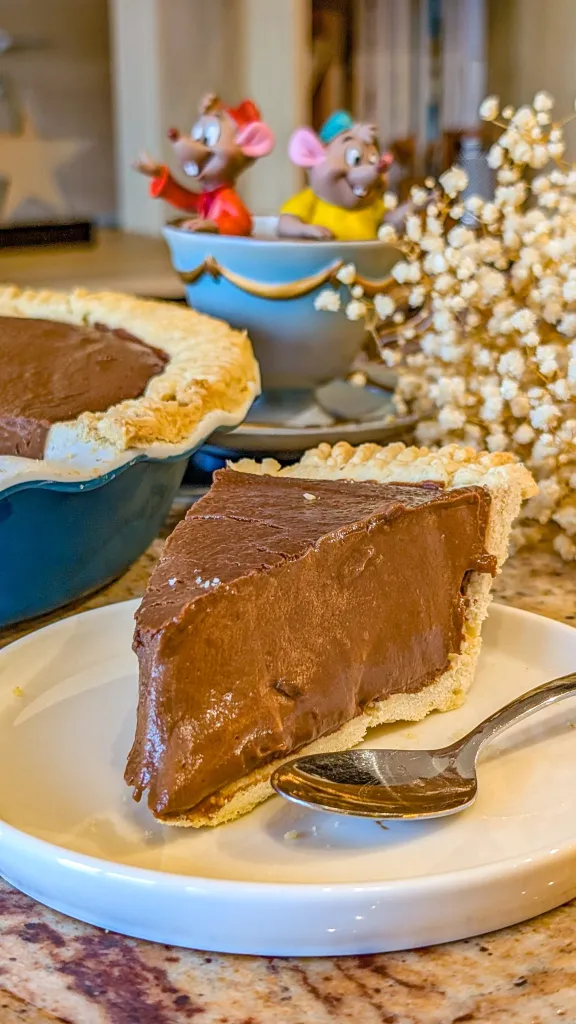
This Gone to Heaven Chocolate Pie is an ultra-rich, silky-smooth chocolate cream pie featuring a homemade chocolate pudding filling made with real chocolate chips, nestled in a flaky pie crust and topped with billowy whipped cream. By cooking a cornstarch-thickened custard on the stovetop, then enriching it with melted chocolate, butter, and vanilla before chilling until set, this recipe creates the kind of decadent, old-fashioned chocolate pie that lives up to its heavenly name. The result is a slice-and-serve dessert with velvety chocolate filling, crisp pastry shell, and clouds of whipped cream that’s perfect for chocolate lovers, special occasions, or any time you want to create something truly memorable.
Why You’ll Love This Recipe
- Pure Chocolate Indulgence – Delivers intense, authentic chocolate flavor from real chocolate chips rather than cocoa powder, creating deeper, more luxurious taste.
- Silky-Smooth Texture – The cornstarch-thickened custard creates perfectly smooth, pudding-like filling that slices cleanly without being gelatinous or grainy.
- Classic American Dessert – Honors the tradition of old-fashioned chocolate cream pies that have graced American tables for generations with nostalgic, comforting appeal.
- Impressive Presentation – The beautiful contrast of dark chocolate filling, golden crust, and white whipped cream creates stunning visual impact perfect for entertaining.
- Make-Ahead Convenience – Requires several hours of chilling anyway, making it ideal for preparing the day before and freeing you from last-minute dessert stress.
- Customizable Chocolate – Works equally well with milk chocolate for sweeter flavor or dark chocolate for more sophisticated, bittersweet taste.
Ingredients You’ll Need
For the Pie Shell:
- 1 deep-dish 9-inch pie shell (store-bought or homemade) – Provides the crisp, buttery foundation that contrasts with creamy filling
For the Chocolate Cream Filling:
- ⅓ cup cornstarch – Thickens the filling to proper sliceable consistency without eggs alone
- ⅔ cup granulated sugar – Sweetens the filling; amount balances with chocolate bitterness
- ½ teaspoon salt – Enhances chocolate flavor and balances sweetness
- 3 cups whole milk – Creates the creamy base for the chocolate custard
- 4 large egg yolks – Adds richness, color, and additional thickening power to the custard
- 2 cups chocolate chips (milk chocolate or dark chocolate, about 12 ounces) – Provides the primary chocolate flavor; quality matters here
- 2 tablespoons unsalted butter – Adds richness and silky texture to the finished filling
- 1 tablespoon vanilla extract – Enhances and rounds out the chocolate flavor
For Topping:
- Sweetened whipped cream or whipped topping (about 2 cups) – Provides classic finishing touch and lightness that balances rich chocolate
- Optional: Chocolate shavings, cocoa powder, or chocolate curls for garnish
Step-by-Step Instructions
Pre-Bake the Pie Shell If using an unbaked pie shell, preheat your oven to 375°F. Line the pie crust with parchment paper or aluminum foil and fill with pie weights, dried beans, or rice to prevent bubbling and shrinking. Bake for 12-15 minutes until the edges are lightly golden. Remove the weights and parchment, then bake for another 3-5 minutes if the bottom looks pale. Let the crust cool completely on a wire rack before filling. If using a pre-baked store-bought shell, proceed to the next step.
Prepare the Dry Ingredients In a medium saucepan (off heat), whisk together the cornstarch, sugar, and salt until evenly combined with no lumps visible. The thorough mixing now prevents lumps in the finished filling.
Combine Wet Ingredients In a separate bowl, lightly beat the egg yolks with a fork or whisk just until broken up and slightly smooth. Gradually pour the milk into the saucepan with the dry ingredients, whisking constantly until smooth. Then slowly whisk in the beaten egg yolks, stirring constantly to incorporate them evenly without creating lumps.
Cook the Custard Place the saucepan over medium heat. Cook the mixture, whisking constantly and scraping the bottom and corners of the pan, for 7-10 minutes. The mixture will start thin, then gradually thicken. Continue cooking and whisking constantly until it thickens dramatically and just begins to bubble—you’ll see large bubbles breaking the surface. Once it reaches this point, cook for 1 more minute while whisking, then immediately remove from heat. Don’t walk away during this step or the custard can scorch.
Add the Chocolate Remove the saucepan from heat and immediately add all the chocolate chips at once. Let them sit in the hot custard for 1-2 minutes to soften, then stir vigorously with a whisk or wooden spoon until the chocolate melts completely and the mixture becomes smooth and glossy with no chip pieces remaining.
Stir in Butter and Vanilla Add the butter and vanilla extract to the chocolate mixture, stirring until the butter melts completely and incorporates smoothly. The butter adds sheen and silky mouthfeel while the vanilla enhances the chocolate flavor.
Fill the Pie Shell Pour the warm chocolate filling into the completely cooled pie shell, using a spatula to guide it evenly. Gently smooth the top with an offset spatula or the back of a spoon, creating an even surface. If a skin starts forming, press a piece of plastic wrap directly onto the surface of the filling to prevent it.
Chill Until Set Refrigerate the pie uncovered (or loosely covered once the surface has cooled) for at least 4 hours, though overnight is ideal. The filling needs this extended chilling time to set properly from liquid custard to firm, sliceable texture. Don’t rush this step or the filling will be too soft to slice cleanly.
Add Whipped Cream Just before serving, top the chilled pie with sweetened whipped cream. You can spread it evenly across the entire surface, pipe decorative rosettes around the edge, or dollop it on individual slices. If using store-bought whipped topping, spread or pipe as desired.
Garnish and Serve If desired, garnish the whipped cream with chocolate shavings made by running a vegetable peeler along a chocolate bar, a light dusting of cocoa powder, or chocolate curls for elegant presentation. Slice with a sharp knife dipped in hot water and wiped clean between cuts for neat portions. Serve cold.
Recipe Notes & Tips
- Constant Whisking – Never stop whisking while cooking the custard; leaving it unattended even briefly can cause scorching on the bottom or lumpy texture.
- Temperature Management – Medium heat is crucial; too high and the eggs can scramble or the bottom can burn, too low and it takes forever to thicken.
- Chocolate Quality – Use good-quality chocolate chips for best flavor; cheap chocolate creates waxy, less rich filling. Ghirardelli, Guittard, or similar brands work well.
- Milk vs. Dark Chocolate – Milk chocolate creates sweeter, more kid-friendly pie; dark chocolate (60-70% cacao) produces sophisticated, bittersweet flavor for adults.
- Complete Cooling – The pie shell must be completely cool before filling; warm crust causes condensation that makes the bottom soggy.
- Setting Time – Don’t cut corners on chilling; 4 hours minimum is necessary, but overnight produces better texture and flavor as everything melds.
Nutritional Information
- Prep Time: 25 minutes (pre-baking crust, making filling)
- Cook Time: 15 minutes (baking crust + cooking filling)
- Chilling Time: 4+ hours (essential for proper setting)
- Total Time: 4½+ hours (mostly passive chilling)
- Servings: 8-10 slices
- Calories: Approximately 450-500 per slice (varies based on portion size and whipped cream amount)
Perfect Pairings
- Serve with hot coffee, espresso, or cappuccino for classic dessert-and-coffee combination where bitter notes complement sweet chocolate.
- Pair with cold milk—especially popular with children—for the timeless chocolate-and-milk pairing.
- Complement with fresh raspberries or strawberries for tart fruit that cuts through the richness and adds color.
- Accompany with a small glass of dessert wine, port, or Irish cream liqueur for elegant after-dinner presentation.
Ideal Occasions
- Perfect for Thanksgiving, Christmas, or Easter dinners when you want impressive dessert that can be made completely ahead without last-minute work.
- Excellent choice for birthday celebrations, potlucks, or dinner parties when you need crowd-pleasing dessert that appeals to chocolate lovers of all ages.
- Ideal for Valentine’s Day or anniversary celebrations when you want romantic, indulgent dessert that shows effort and care.
- Great option for bake sales, church socials, or community events where classic, familiar desserts are expected and appreciated.
Storage & Serving Tips
- Store leftover pie covered in the refrigerator for up to 3 days; the filling remains set but the crust may soften slightly from moisture.
- Always serve cold directly from the refrigerator; room temperature causes the filling to soften and lose its clean-slicing texture.
- Add whipped cream topping just before serving rather than storing the whole pie with cream, which can weep and make the filling watery.
- This pie doesn’t freeze well due to the custard filling, which can separate and become grainy when thawed; enjoy fresh within a few days.
Creative Variations to Try
- Peanut Butter Chocolate – Add ½ cup creamy peanut butter with the chocolate for Reese’s-inspired flavor combination.
- Mint Chocolate – Replace vanilla with peppermint extract and use dark chocolate for elegant mint chocolate variation.
- Mocha – Add 2 tablespoons instant espresso powder to the milk for sophisticated coffee-chocolate flavor.
- Oreo Crust – Use crushed Oreo cookie crust instead of traditional pastry for cookies-and-cream inspired variation.
Troubleshooting Common Issues
- Lumpy filling – Cornstarch wasn’t whisked into dry ingredients thoroughly or mixture wasn’t whisked constantly during cooking; strain through fine-mesh sieve if lumpy.
- Filling too soft/won’t set – Didn’t cook long enough or didn’t chill sufficiently; ensure full bubbling/thickening during cooking and refrigerate overnight.
- Grainy texture – Eggs scrambled from too-high heat or chocolate seized; cook over medium (not high) heat and ensure chocolate melts smoothly in hot custard.
- Soggy crust – Filled the crust while it was warm or didn’t pre-bake thoroughly; always cool crust completely and ensure it’s fully baked before filling.
Why This Recipe Works
This chocolate cream pie succeeds by using proper custard-making technique combined with real chocolate to create filling that’s both stable enough to slice and luxuriously creamy. The cornstarch provides primary thickening power that creates structure allowing the pie to slice cleanly—eggs alone wouldn’t provide enough body. Cooking the cornstarch thoroughly (until bubbling) is crucial; undercooked cornstarch tastes chalky and doesn’t develop proper thickening power. The egg yolks add richness, beautiful color, and additional thickening while contributing to the silky texture. Whisking constantly prevents the eggs from scrambling and ensures even cooking without lumps or scorching. Adding chocolate chips to the hot-off-the-stove custard melts them perfectly from residual heat without requiring additional cooking that could cause graininess. Using real chocolate chips rather than cocoa powder creates more authentic, intense chocolate flavor with better mouthfeel from the cocoa butter. The butter stirred in at the end adds sheen and silky texture while the vanilla rounds out and enhances the chocolate flavor. The extended chilling time is essential—cornstarch-thickened mixtures need cold temperature to fully set into firm, sliceable consistency. Pre-baking the crust ensures it’s crispy and fully cooked rather than becoming soggy from the moist filling. The whipped cream topping provides textural and flavor contrast—light and airy versus dense and rich—while adding visual appeal. At approximately 450-500 calories per slice, this is an indulgent dessert with significant calories from chocolate, milk, egg yolks, butter, pie crust, and whipped cream—it’s celebration food meant for special occasions when you want maximum satisfaction and aren’t concerned with lighter eating.
Final Thoughts
Gone to Heaven Chocolate Pie lives up to its evocative name by delivering the kind of pure, uncomplicated chocolate satisfaction that reminds us why classic recipes become classics—they do one thing supremely well without unnecessary complications or trendy additions. This pie represents old-fashioned American dessert-making at its finest: real ingredients, proper technique, and patience rewarded with something genuinely special. The smooth, rich chocolate filling captures what chocolate cream pie should be—not too sweet, not bitter, just perfectly balanced chocolate luxury in creamy, sliceable form. While modern desserts often chase novelty with exotic ingredients or molecular techniques, this pie proves that sometimes the best approach is respecting tradition and executing fundamentals flawlessly. Making this pie from scratch requires time and attention during the cooking phase, but none of the steps are particularly difficult, and the make-ahead nature actually makes it more practical than many “easier” desserts for entertaining. Whether you’re continuing a family tradition, discovering chocolate cream pie for the first time, celebrating a chocolate lover’s birthday, or simply want to understand why this style of pie has endured for generations, this Gone to Heaven version delivers on every promise—it’s smooth, it’s chocolatey, it’s beautiful when sliced, and yes, it genuinely tastes like something heavenly, proving that sometimes the most memorable desserts are the ones that don’t try to be anything other than perfectly executed versions of timeless classics that have brought joy to countless tables across generations.


