
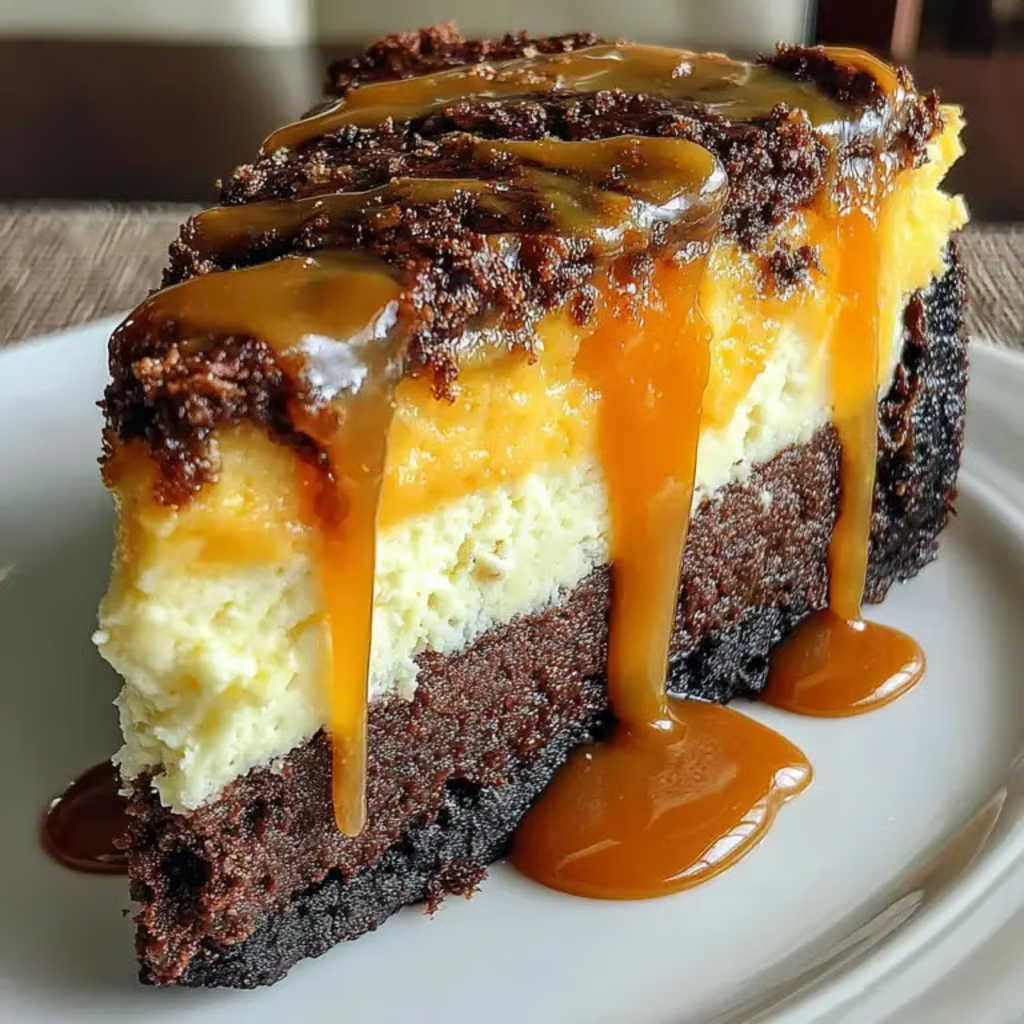
This show-stopping layered dessert combines three indulgent elements—fudgy chocolate brownie base, rich creamy cheesecake middle, and glossy salted caramel topping—into one spectacular treat that delivers the perfect contrast of dense chocolate, tangy cream cheese, and sweet-salty caramel in every slice. The genius technique—par-baking the brownie layer first until just set, then carefully pouring the cheesecake batter on top before finishing both layers together in the oven—ensures each component maintains its distinct texture while the extended chilling time allows flavors to meld and the cheesecake to achieve its signature dense, creamy consistency that makes this the ultimate special-occasion dessert worth the 105-minute investment.
Why You’ll Love This Recipe
- Triple-Layer Indulgence – Combines three beloved desserts (brownie, cheesecake, caramel) into one spectacular creation that satisfies multiple cravings simultaneously.
- Fudgy Brownie Foundation – The dense, cocoa-rich brownie base provides perfect textural contrast to the creamy cheesecake above.
- Classic Cheesecake Texture – Using cream cheese, both sugars, and cream creates the authentic dense, tangy, velvety texture of great New York-style cheesecake.
- Salted Caramel Finish – The sweet-salty caramel drizzle adds sophistication and balances the richness of chocolate and cream cheese.
- Make-Ahead Perfect – Actually improves when made a day ahead as flavors meld and texture sets, perfect for stress-free entertaining.
- Impressive Presentation – The layered appearance with caramel drizzle creates stunning visual appeal that makes this ideal for celebrations.
Ingredients You’ll Need
For the Brownie Layer:
- 1 stick (113g) unsalted butter, melted – Provides rich, fudgy foundation
- 1 cup (200g) granulated sugar – Sweetens and creates proper texture
- 1 cup (85g) unsweetened cocoa powder – Delivers intense chocolate flavor; use Dutch-process for deeper color
- ¼ tsp fine sea salt – Enhances chocolate flavor
- ½ tsp vanilla extract – Adds aromatic depth
- 2 large eggs – Binds brownie batter and creates fudgy texture
- ½ cup (62g) all-purpose flour – Provides structure; minimal amount keeps brownies fudgy
For the Cheesecake Layer:
- 24 oz (680g) cream cheese, softened to room temperature – Creates the rich, tangy base; must be soft for smooth texture
- ½ cup (100g) granulated sugar – Sweetens the cheesecake
- ½ cup (100g) light brown sugar – Adds moisture and subtle molasses depth
- ¼ cup (60ml) heavy cream – Contributes additional richness and creamy texture
- 4 large eggs, room temperature – Binds cheesecake and creates proper set; room temp essential
- 2 tsp vanilla extract or vanilla bean paste – Infuses classic vanilla character
For the Topping:
- ½ cup salted caramel sauce – Creates the signature sweet-salty finish
- Additional caramel sauce for drizzling (optional) – For generous topping
- Flaky sea salt for garnish (optional) – Adds textural contrast and balances sweetness
Step-by-Step Instructions
Prepare the Pan and Preheat Preheat your oven to 325°F (163°C) and position a rack in the center. Generously grease a 9-inch springform pan with butter or non-stick spray, ensuring coverage on the bottom and sides. Place the greased springform pan on a rimmed baking sheet—this catches any potential leaks and makes moving the pan easier. Set aside.
Make the Brownie Batter In a large mixing bowl, whisk together the melted butter, granulated sugar, cocoa powder, and fine sea salt for about 1-2 minutes until the mixture is smooth, glossy, and the sugar is mostly dissolved. Add the vanilla extract and whisk to combine. Add the eggs one at a time, whisking vigorously after each addition for about 30 seconds until each egg is fully incorporated before adding the next. The batter should become thicker and shinier. Add the flour and fold it in gently with a rubber spatula until just combined with no streaks of flour remaining—don’t overmix or the brownies will be cakey rather than fudgy.
Par-Bake the Brownie Layer Pour the brownie batter into the prepared springform pan, using a spatula to spread it into an even layer that covers the entire bottom. Place in the preheated 325°F oven and bake for about 15 minutes. The brownie layer is done when the top looks set and slightly puffed but the center is still soft—it shouldn’t be fully cooked as it will continue baking with the cheesecake layer. Remove from the oven and let cool completely at room temperature for at least 30 minutes. This cooling is crucial—adding cheesecake batter to a warm brownie will cause the layers to mix together.
Make the Cheesecake Batter While the brownie cools, prepare the cheesecake: In a large mixing bowl (or stand mixer with paddle attachment), beat the softened cream cheese on medium speed for 2-3 minutes until completely smooth, creamy, and fluffy with no lumps remaining. Scrape down the sides of the bowl. Add both the granulated sugar and light brown sugar along with the heavy cream. Beat on medium speed for another 2-3 minutes until the mixture is light, fluffy, and creamy. Scrape down the bowl again. Add the eggs one at a time, mixing on low speed just until each egg is incorporated before adding the next—don’t overmix or you’ll incorporate too much air, which creates cracks. After all eggs are added, stir in the vanilla extract on low speed just until combined. The batter should be smooth and pourable but not overly airy.
Assemble and Bake Once the brownie layer is completely cool, carefully pour the cheesecake batter over it, spreading gently with a spatula to ensure even coverage all the way to the edges. Gently tap the pan on the counter 2-3 times to release any air bubbles trapped in the batter. Place the pan (still on the rimmed baking sheet) back in the 325°F oven and bake for 55-60 minutes. The cheesecake is done when the edges are set and slightly puffed but the center still jiggles slightly when you gently shake the pan—it should look like soft-set Jell-O in the middle. Don’t overbake or the cheesecake will crack and have dry texture.
Cool in Oven When baking time is complete, turn off the oven but leave the cheesecake inside. Crack the oven door open about 1 inch (you can prop it with a wooden spoon) and let the cheesecake cool gradually in the oven for 10 minutes. This prevents sudden temperature change that causes cracking.
Cool Completely After 10 minutes, remove the cheesecake from the oven and place on a wire cooling rack. Let it cool completely at room temperature for about 2 hours. The cheesecake will sink slightly and continue setting as it cools—this is normal.
Refrigerate Once completely cool to room temperature, cover the cheesecake (still in the springform pan) tightly with plastic wrap and refrigerate for at least 4 hours, but preferably overnight (8-12 hours). This extended chilling is essential—it allows the cheesecake to fully set to proper dense, creamy texture and the flavors to meld together.
Release and Top When ready to serve, remove the cheesecake from the refrigerator. Run a thin knife around the edge between the cheesecake and the pan to loosen it. Carefully release and remove the springform ring. Using two large spatulas, carefully transfer the cheesecake (still on the springform base or moved to a serving plate) to your serving platter. Warm the ½ cup salted caramel sauce slightly (10-15 seconds in microwave) to make it pourable. Drizzle the caramel over the entire top of the cheesecake in decorative patterns. If desired, drizzle additional caramel and sprinkle with flaky sea salt for garnish.
Slice and Serve For clean slices, run a large, sharp knife under hot water, wipe it dry, then slice. Clean and warm the knife between each cut. Serve slices chilled or let them sit at room temperature for 10-15 minutes before serving for slightly softer texture.
Recipe Notes & Tips
- Room Temperature Crucial – Cream cheese and eggs must be room temperature for smooth, lump-free cheesecake batter; set out 1-2 hours ahead.
- Complete Cooling Essential – Cool brownie layer completely before adding cheesecake; warm brownies cause layers to mix together.
- Don’t Overmix – Mix cheesecake batter just until combined; overmixing incorporates air that causes cracks.
- Jiggle Test – Cheesecake is done when edges are set but center jiggles like soft-set Jell-O; it continues setting as it cools.
- Overnight Chilling – While 4 hours is minimum, overnight chilling produces vastly superior texture and allows flavors to develop.
- Springform Essential – Regular cake pan won’t work; must use springform for easy removal without damaging layers.
Nutritional Information
Prep Time: 30 minutes
Cook Time: 75 minutes (15 min brownie + 60 min cheesecake)
Cooling Time: 4+ hours minimum (overnight preferred)
Total Time: 5+ hours (including chilling)
Servings: 12 servings
Calories: Approximately 450 calories per serving (based on provided data)
Perfect Pairings
- Fresh Berries – Serve with fresh raspberries or strawberries to cut through richness with tart contrast.
- Whipped Cream – Top with lightly sweetened whipped cream for additional indulgence.
- Coffee – Pair with strong espresso or cappuccino that complements chocolate and cuts through richness.
- Dessert Wine – Serve with sweet wine like Port or Moscato d’Asti for elegant dinner party finale.
Ideal Occasions
- Birthday Celebrations – The impressive layered appearance and indulgent flavors make this perfect for birthday dinners.
- Holiday Gatherings – Ideal for Thanksgiving, Christmas, or New Year’s when you want show-stopping dessert.
- Dinner Parties – Make-ahead nature and impressive presentation make this excellent for entertaining guests.
- Special Celebrations – Perfect for anniversaries, graduations, or any occasion deserving exceptional dessert.
Storage & Serving Tips
- Refrigerator Storage – Cover tightly with plastic wrap and refrigerate for up to 5 days; flavors improve over first 2 days.
- Freezing Instructions – Wrap individual slices tightly in plastic then foil, freeze up to 2 months; thaw overnight in refrigerator.
- Serving Temperature – Best served cold from refrigerator or at cool room temperature after sitting out 10-15 minutes.
- Clean Slicing – Warm knife under hot water, wipe dry, then slice; clean and warm between each cut for neat slices.
Creative Variations to Try
- Peanut Butter Swirl – Swirl ⅓ cup peanut butter into cheesecake batter before baking for chocolate-peanut butter version.
- Raspberry Layer – Spread raspberry preserves over brownie before adding cheesecake for fruity variation.
- Chocolate Ganache – Replace caramel with chocolate ganache topping for double-chocolate indulgence.
- Espresso Enhancement – Add 1 tablespoon instant espresso powder to brownie batter for mocha variation.
Troubleshooting Common Issues
- Cracked Top – Overmixed batter, overbaked, or cooled too quickly; mix gently, bake until just set, cool gradually in oven.
- Mixed Layers – Added cheesecake to warm brownie; always cool brownie completely to room temperature first.
- Soggy Bottom – Brownie underbaked or cheesecake overbaked; bake brownie full 15 minutes and remove cheesecake when center jiggles.
- Dense/Dry Texture – Overbaked or ingredients not room temperature; bake just until set and ensure proper ingredient temps.
Why This Recipe Works
This spectacular layered dessert succeeds by understanding how to properly sequence and bake different components that require different temperatures and times while ensuring each maintains its distinct character. The brownie layer uses minimal flour (½ cup) relative to butter and cocoa, creating dense, fudgy texture rather than cakey. Par-baking for just 15 minutes sets the structure without fully cooking, allowing it to finish baking with the cheesecake while maintaining fudgy interior. Cooling completely before adding cheesecake prevents layers from mixing—warm brownies would cause cheesecake to sink in. The cheesecake uses classic New York-style proportions: substantial cream cheese (24 oz) provides tangy, rich base; both granulated and brown sugars sweeten while brown sugar adds moisture and subtle depth; heavy cream contributes additional richness; eggs bind and create proper set; vanilla adds aromatic character. Room temperature ingredients are crucial—cold cream cheese creates lumps, cold eggs don’t incorporate smoothly. Gentle mixing prevents incorporating excess air that creates cracks. Baking at moderate temperature (325°F) ensures gentle, even cooking. The jiggle test (edges set, center soft) indicates proper doneness—the center continues setting as it cools through carryover cooking. Gradual cooling in oven with door cracked prevents sudden temperature change that causes cracks. Extended refrigeration (4+ hours, overnight best) allows cheesecake to fully set to proper dense, creamy texture while flavors meld. Salted caramel provides sweet-salty finish that balances richness. At 450 calories per generous slice, this delivers indulgent satisfaction appropriate for special-occasion dessert.
Final Thoughts
Caramel Brownie Cheesecake Bliss demonstrates that truly impressive desserts—the kind that elicit gasps when presented and silence when eaten—require understanding proper technique (sequential baking, temperature control, extended chilling) combined with quality ingredients that each contribute essential character to the final result. The recipe proves that some desserts are worth the investment of time and multiple steps when the payoff is spectacular presentation and extraordinary flavor that makes celebrations memorable. This layered creation shows how combining classic dessert elements thoughtfully rather than haphazardly creates something greater than the sum of its parts—the fudgy brownie provides chocolatey foundation and textural contrast, the tangy cheesecake delivers creamy richness, the salted caramel adds sophisticated sweet-salty finish. Whether you’re celebrating birthdays that deserve show-stopping cakes, planning holiday gatherings when you want impressive finales, hosting dinner parties where dessert makes the lasting impression, or simply wanting to create the kind of bakery-quality layered dessert that seems impossible at home, this make-ahead masterpiece adapts to your needs while consistently delivering that perfect forkful where dense chocolate brownie, velvety cream cheese filling, and glossy salted caramel come together in moderately challenging but entirely achievable, absolutely spectacular harmony that makes every celebration feel special and proves that home bakers armed with proper technique and patience can create desserts that rival professional pastry chefs when they invest the time and care these multi-layered showpieces deserve.


