
This inventive recipe reimagines the classic taco night by swapping traditional corn or flour shells for buttery, crispy garlic toast. The result is a satisfying fusion of textures—crunchy bread housing savory, seasoned meat and melty cheese—that comes together in under 20 minutes. It is a highly customizable and budget-friendly option perfect for busy weeknight dinners or casual entertaining.
Why You’ll Love This Recipe
- Incredible Texture Contrast – Offers a satisfying crunch from the toasted bread edges that perfectly complements the tender, savory meat filling and soft, melted cheese.
- Budget-Friendly Ingredients – Utilizes affordable staples like ground meat, frozen bread, and pantry spices to create a substantial meal without a high cost.
- Rapid Preparation – Comes together in roughly 20 minutes, utilizing the oven and stovetop simultaneously to maximize efficiency.
- Customizable “Boats” – The individual portion sizes allow family members to customize their own toppings without affecting the main dish.
- Freezer Staple Friendly – Relies on ingredients often found in the freezer and pantry, making it an excellent “emergency meal” when fresh groceries are low.
- Kid-Approved Flavors – Combines the universally loved flavors of garlic bread and tacos into a fun, handheld format that appeals to picky eaters.
Ingredients You’ll Need
The Base & Filling
- Ground Beef (1 lb) – Preferably 80/20 or 90/10 lean-to-fat ratio; provides the savory protein base for the filling.
- Diced Onion (1/4 Cup) – Yellow or white onion; adds aromatics, slight sweetness, and texture to the meat mixture.
- Taco Seasoning (1 Packet) – Or 2 tablespoons homemade; provides the essential cumin, chili powder, and paprika flavor profile.
- Water (1/2 Cup) – Necessary to bloom the spices and create a cohesive sauce that coats the meat.
- Frozen Garlic Toast (8 Count Box) – Thick-cut “Texas Toast” style works best; serves as the sturdy, flavorful vessel for the meat.
The Toppings
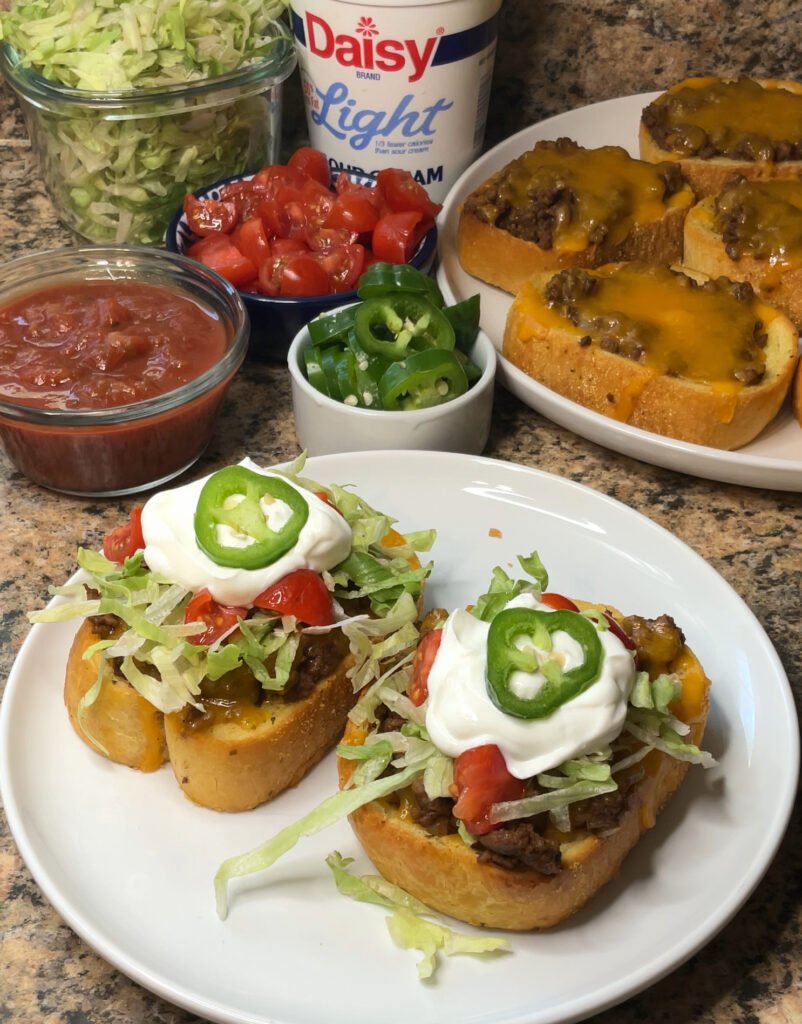
- Shredded Cheddar Cheese (8 oz) – Sharp or mild; acts as the binding agent and adds a creamy, salty finish.
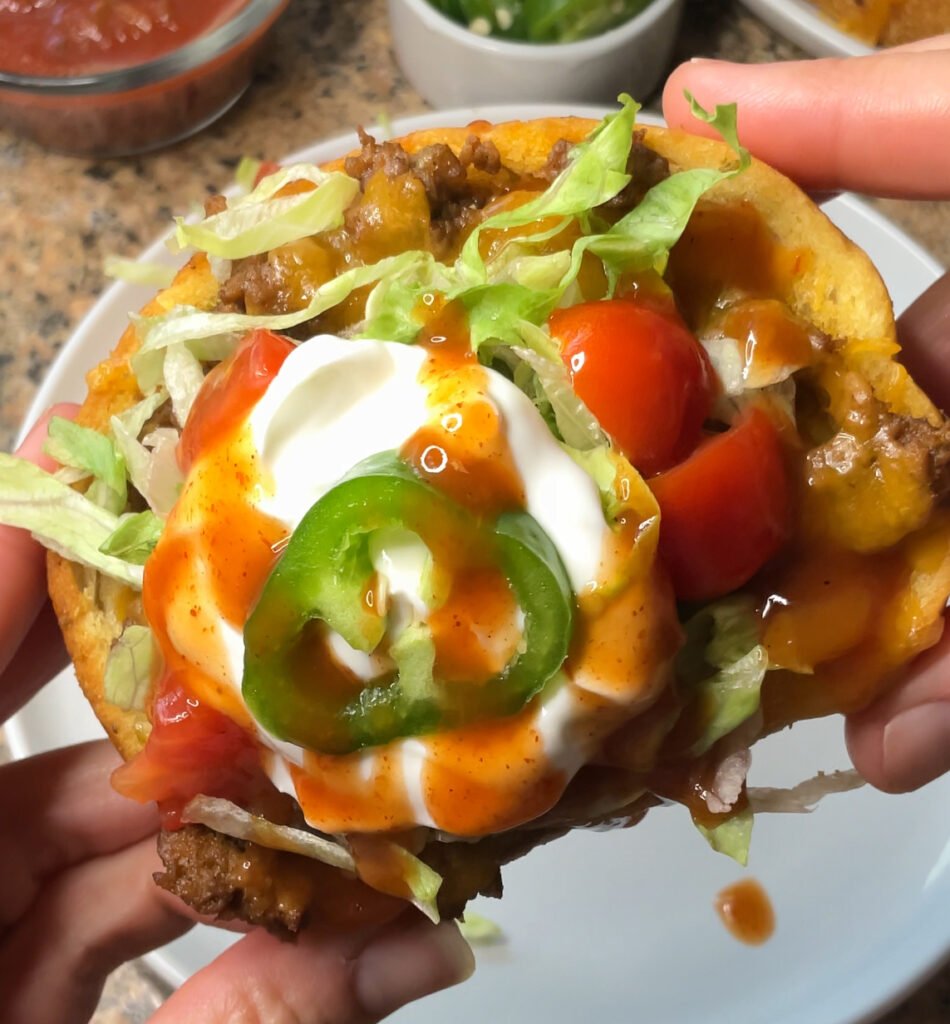
- Fresh Garnishes (Optional) – Lettuce, diced tomatoes, sour cream, or hot sauce; these add freshness, acidity, and temperature contrast to the hot toast.
Step-by-Step Instructions
1. Prepare the Oven and Toast Preheat your oven to 425°F (220°C). Arrange the frozen garlic toast slices in a single layer on a baking sheet and bake for 8 minutes, or until they are just starting to turn golden but are not fully crisp.
2. Sauté the Aromatics and Meat While the oven heats, place a large skillet over medium heat. Add the ground beef and diced onion, breaking up the meat with a spatula. Cook until the beef is fully browned and the onions are translucent.
3. Simmer the Filling Drain excess grease from the skillet to prevent a greasy final product. Add the taco seasoning packet and water to the beef. Stir well and simmer on low for 3–4 minutes until the sauce thickens and coats the meat.
4. Create the Bread “Wells” Remove the toast from the oven (keep the oven on). Using the back of a spoon, gently press down the center of each toast slice to create a shallow indentation or “boat.” This compresses the soft bread to make room for the filling while keeping the crusty edges intact.
5. Assemble the Toast Spoon the seasoned taco meat evenly into the wells you created in the garlic toast. Top generously with the shredded cheddar cheese.
6. Final Bake Return the assembled toasts to the oven for 2–3 minutes. Watch closely; you want the cheese to melt and bubble, but the edges of the bread should not burn.
7. Garnish and Serve Remove from the oven and immediately top with cold garnishes like shredded lettuce, tomatoes, or a dollop of sour cream. Serve hot.
Recipe Notes & Tips
- The “Pressing” Technique – Do not skip the step of pressing the center of the bread. This structural modification creates a density in the middle that prevents the sauce from soaking through too quickly, while leaving the edges airy and crisp.
- Draining is Crucial – Be sure to drain the fat from the ground beef thoroughly before adding the water and seasoning. Excess oil combined with the butter already in the garlic toast can lead to a heavy, greasy mouthfeel.
- Cheese Selection – For the best melt, shred a block of cheddar cheese yourself. Pre-shredded bagged cheese contains anti-caking agents (cellulose) that can prevent it from melting into a smooth, cohesive layer.
- Toast Varieties – Use thick-cut frozen toast (often labeled Texas Toast). Standard sliced bread or thin garlic baguettes may become too soggy to hold the weight of the meat filling.
- Spice Control – If cooking for young children, you can use half a packet of seasoning or make your own blend to control the sodium and heat levels.
Nutritional Information
- Prep Time: 5 minutes
- Cooking Time: 15 minutes
- Total Time: 20 minutes
- Servings: 4 (Assumes 2 slices per person)
- Calories: Approximately 450–500 kcal per serving (highly dependent on bread brand and fat content of beef).
Perfect Pairings
- Mexican Street Corn Salad – The sweetness of corn and tang of cotija cheese balances the savory garlic and beef flavors.
- Cilantro Lime Rice – A fluffy, citrus-forward side dish that adds bulk to the meal if you are serving hungry teenagers.
- Simple Green Salad with Vinaigrette – The acidity of a vinegar-based dressing helps cut through the richness of the butter and cheese.
- Black Bean Soup – A warm, earthy side dish that complements the Tex-Mex flavor profile.
Ideal Occasions
- Game Day Appetizers – These can be cut in half diagonally to create finger-food triangles perfect for watching sports.
- Busy Weeknights – Ideal for days when you have less than 30 minutes to get dinner on the table.
- Kids’ Sleepovers – A fun, customizable meal that is easy to batch-cook for a crowd.
- Budget-Conscious Dining – A gourmet-feeling meal that utilizes economical ingredients.
Storage & Serving Tips
- Refrigerator Storage – Store leftovers in an airtight container for up to 3 days. Store the toppings (lettuce/sour cream) separately to prevent sogginess.
- Reheating in Air Fryer – The best method for reheating is an air fryer at 350°F for 3–5 minutes. This revives the crispiness of the bread.
- Reheating in Oven – Place on a baking sheet at 400°F for 5–7 minutes until heated through.
- Avoid the Microwave – Microwaving will turn the garlic toast rubbery and chewy; avoid this method if possible.
Creative Variations to Try
- Creamy Taco Version – Stir 2 ounces of cream cheese into the taco meat mixture during the simmering stage for a rich, velvety filling.
- Mexican Street Corn Style – Top the finished meat with roasted corn kernels, crumbed cotija cheese, Tajín seasoning, and a drizzle of lime crema.
- Meatless Monday Swap – Substitute the ground beef with a mixture of black beans and lentils, or use a plant-based meat crumble for a vegetarian option.
- Spicy Kick – Add diced jalapeños to the onion sauté or use “Hot” taco seasoning and Pepper Jack cheese instead of Cheddar.
Troubleshooting Common Issues
- Soggy Bread Base – Solution: Ensure you par-bake the toast for the full 8 minutes before stuffing. The bread needs to develop a crust before the wet ingredients are added.
- Burnt Garlic Edges – Solution: If the toast is browning too fast during the final melt, move the tray to a lower rack in the oven.
- Dry Meat Filling – Solution: You may have simmered the water out too long. Stir in a tablespoon of salsa or water to re-hydrate the meat before stuffing the toast.
- Cold Center – Solution: Make sure the meat mixture is piping hot when you spoon it onto the toast. The final bake is short and intended only to melt cheese, not to reheat the meat.
Why This Recipe Works
This recipe succeeds by leveraging the culinary concept of texture layering. By par-baking the garlic toast, you initiate the Maillard reaction on the bread surface, creating a rigid, crispy barrier. When the center is compressed, it creates a dense foundation capable of supporting the moisture-heavy meat sauce without disintegrating. The garlic butter on the toast acts as a base fat that enhances the spices in the taco seasoning (which are fat-soluble), amplifying the overall flavor profile. The final flash-bake binds the ingredients together with cheese, creating a cohesive unit that offers crunch, chew, and creaminess in a single bite.
Final Thoughts
Taco Stuffed Garlic Toast is a prime example of how combining two simple convenience foods can result in a dish that is greater than the sum of its parts. It creates a fun, flavorful dining experience that requires minimal effort and cleanup. While it is an indulgent meal due to the butter and cheese content, it can easily be lightened up by using lean ground turkey and reduced-fat cheese, making it a versatile addition to any family’s recipe rotation.


