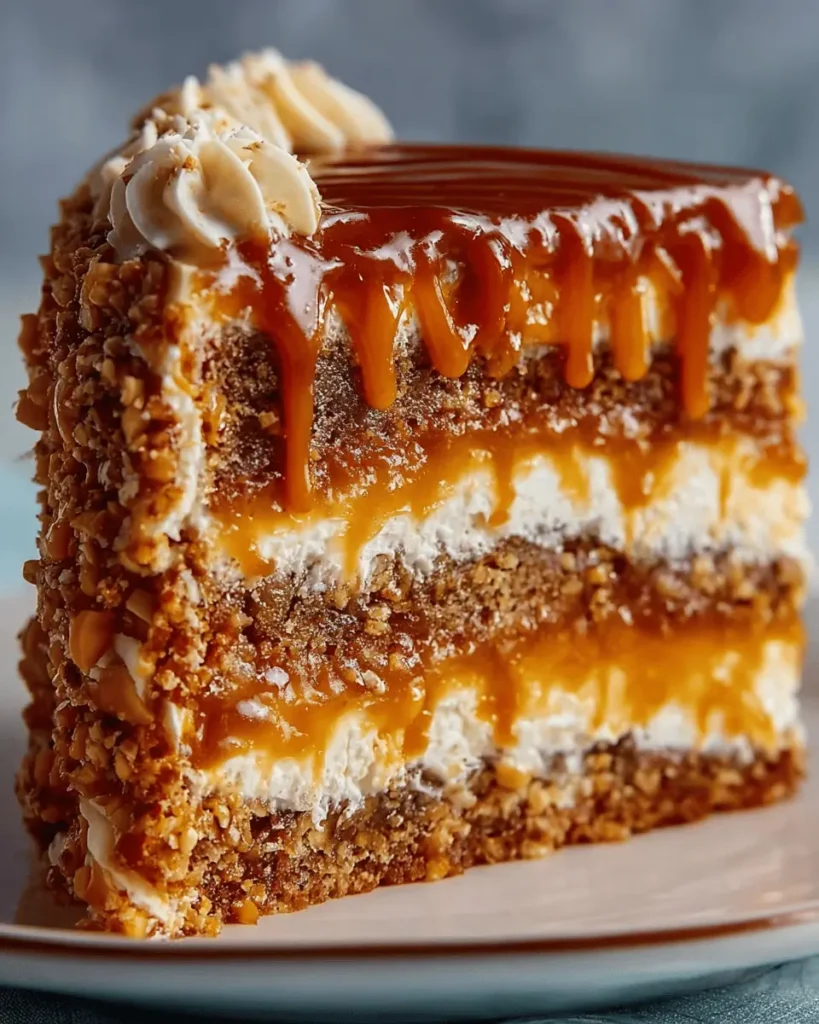
This caramel crunch layer cake delivers pure indulgence by stacking three tender, buttery cake layers with generous amounts of smooth caramel sauce and crunchy toffee pieces, then enrobing everything in more caramel and toffee for a dessert that celebrates the addictive combination of sweet, salty, and crunchy textures. The technique involves creating a classic butter cake with proper creaming method for light, tender crumb, baking in three thin layers for easier assembly and more dramatic presentation, then building flavor and texture through strategic layering that ensures every bite contains cake, caramel, and crunch. With its impressive three-tier appearance and restaurant-quality flavors achieved through straightforward baking methods, this cake transforms special occasions into memorable celebrations while proving that spectacular desserts don’t always require professional pastry skills.
Why You’ll Love This Recipe
Show-Stopping Presentation – Three distinct layers create dramatic height and visual impact that makes this cake the centerpiece of any dessert table or celebration.
Textural Heaven – The contrast between soft, tender cake, smooth caramel sauce, and crunchy toffee pieces creates the kind of complex texture that keeps you coming back for another bite.
Caramel Lover’s Dream – With caramel both layered inside and frosted outside, this cake delivers intense caramel flavor that satisfies serious sweet-and-salty cravings.
Manageable Baking Project – Despite looking professional, this cake uses straightforward techniques and accessible ingredients that confident home bakers can master successfully.
Make-Ahead Friendly – You can bake the cake layers a day in advance and assemble just before serving, or even assemble completely and refrigerate overnight for easier entertaining.
Versatile Celebration Cake – Appropriate for birthdays, anniversaries, holidays, or any occasion that calls for something truly special and indulgent.
Ingredients You’ll Need
For the Cake Layers
1½ cups all-purpose flour – Provides the structure for tender cake layers with enough protein to support the filling and frosting without becoming tough or dense.
1 cup granulated sugar – Sweetens the cake and contributes to tender texture by interfering with gluten development while also helping create proper crumb structure.
½ cup unsalted butter, softened – Creates rich flavor and tender texture through proper creaming with sugar, with unsalted allowing you to control the salt level precisely.
2 large eggs – Binds the ingredients together and provides structure through their proteins while also contributing richness and helping create proper rise.
1 teaspoon vanilla extract – Enhances all the other flavors and adds aromatic complexity that rounds out the sweet profile without being distinctly identifiable.
1 teaspoon baking powder – Provides the chemical leavening that creates rise and light, fluffy texture rather than dense, compact cake.
½ teaspoon salt – Balances the sweetness and enhances all the other flavors while also strengthening the gluten structure for better texture.
¾ cup heavy cream – Adds moisture and richness while contributing to tender crumb through its fat content, creating more luxurious texture than milk would provide.
For Assembly and Decoration
1 cup caramel sauce – Provides the signature flavor and acts as both filling between layers and frosting on the exterior, binding everything together with sweet, buttery richness.
1 cup crushed toffee pieces – Delivers the essential crunch and salty-sweet complexity that elevates this from simple caramel cake to something special and texturally interesting.
Step-by-Step Instructions
Preheat Oven and Prepare Pans Set your oven to 350°F and let it preheat for at least 15 minutes to ensure even temperature. Grease three 6-inch round cake pans thoroughly with butter or nonstick spray, then dust lightly with flour, tapping out excess, or line the bottoms with parchment paper circles for insurance against sticking.
Cream Butter and Sugar In a large mixing bowl using an electric mixer on medium-high speed, beat together the softened butter and granulated sugar for 3-5 minutes until the mixture becomes noticeably lighter in color, increases in volume, and develops a fluffy, almost whipped texture. This creaming process incorporates air that helps create tender cake texture.
Add Eggs and Vanilla Add the eggs one at a time to the creamed butter mixture, beating well after each addition for about 30 seconds to ensure it’s fully incorporated before adding the next. Mix in the vanilla extract until evenly distributed throughout the batter, scraping down the sides of the bowl as needed.
Combine Dry Ingredients In a separate medium bowl, whisk together the flour, baking powder, and salt until uniformly mixed. This whisking distributes the leavening and salt evenly throughout the flour, ensuring consistent rise and seasoning in the finished cake.
Alternate Dry and Wet Additions Add about one-third of the flour mixture to the butter-egg mixture and mix on low speed just until the flour disappears. Add half the heavy cream and mix until incorporated. Continue alternating, adding another third of the flour, the remaining cream, then the final third of flour, mixing only until each addition is just combined. Avoid overmixing, which would develop too much gluten and create tough cake.
Divide and Bake Divide the batter evenly among the three prepared cake pans, using a kitchen scale for precision if available, or eyeballing approximately equal amounts. Smooth the tops with a spatula and tap the pans gently on the counter to release air bubbles. Bake for 25-30 minutes, rotating the pans halfway through if your oven has hot spots, until a toothpick inserted in the center comes out clean and the edges pull slightly away from the pan sides.
Cool Completely Remove the pans from the oven and let the cakes cool in the pans on wire racks for 10 minutes. This brief cooling period allows them to set enough to handle without falling apart. After 10 minutes, run a knife around the edges and invert onto wire racks to cool completely to room temperature before assembling, which takes about 1-2 hours.
Assemble the Layers Place one completely cooled cake layer on your serving plate or cake stand. Spread about ⅓ cup of caramel sauce evenly over the top, leaving a small border around the edge. Sprinkle with about ⅓ cup of crushed toffee pieces. Place the second cake layer on top and repeat with caramel and toffee. Add the final cake layer and press down gently to secure.
Frost and Decorate Spread the remaining caramel sauce over the top and sides of the assembled cake, using an offset spatula or knife to create smooth, even coverage. Work quickly as the caramel may firm up as it spreads. Sprinkle the remaining crushed toffee pieces generously over the top and gently press some onto the sides for complete coverage and visual appeal. Refrigerate for at least 30 minutes to set before slicing.
Recipe Notes & Tips
Butter Temperature Matters – The butter should be softened to room temperature (about 65-70°F) for proper creaming; too cold won’t incorporate air, too warm will make greasy batter.
Don’t Overmix – Once you add the flour, mix only until it disappears into the batter; overmixing develops gluten that creates tough, dense cake rather than tender crumb.
Even Layers – Using a kitchen scale to divide batter ensures equal-sized layers that stack evenly; uneven layers create lopsided cakes that look unprofessional.
Caramel Sauce Options – Use high-quality store-bought caramel sauce for convenience, or make homemade for more control over sweetness and consistency.
Toffee Pieces – Heath bar bits, crushed Skor bars, or homemade English toffee all work well; avoid pieces that are too large, which make slicing difficult.
Assembly Timing – Don’t assemble until the cake layers are completely cool; warm cake will melt the caramel and create sliding layers and messy assembly.
Nutritional Information
Prep Time: 20 minutes
Cook Time: 30 minutes
Total Time: 50 minutes (plus cooling and assembly time)
Servings: 8 slices (⅛ of the cake per serving)
Calories: Approximately 350 calories per slice
Perfect Pairings
Vanilla Ice Cream – Classic vanilla ice cream provides cooling contrast and creamy richness that balances the intense caramel sweetness while melting into the warm cake.
Whipped Cream – Lightly sweetened whipped cream offers a lighter alternative to ice cream while still providing creamy contrast and cutting the richness slightly.
Strong Coffee – Bold coffee or espresso complements the sweet caramel beautifully while its bitterness provides palate-cleansing contrast between bites.
Salted Caramel Sauce – For the truly caramel-obsessed, an extra drizzle of salted caramel sauce on each plate pushes the indulgence even further.
Ideal Occasions
Birthday Celebrations – The impressive presentation and crowd-pleasing flavors make this perfect for birthday parties where the cake needs to be the star attraction.
Anniversary Dinners – The elegant three-layer format and indulgent flavors create the kind of special dessert that marks important relationship milestones.
Holiday Gatherings – While not specifically seasonal, the rich caramel and toffee flavors feel appropriate for fall and winter celebrations when comfort and indulgence are welcomed.
Special Achievement Rewards – When someone accomplishes something significant and deserves a truly special treat, this cake communicates celebration and appreciation.
Storage & Serving Tips
Room Temperature Storage – Store assembled cake covered at room temperature for up to 2 days if your kitchen isn’t excessively warm, though refrigeration is safer.
Refrigerator Storage – Keep the cake covered in the refrigerator for up to 5 days, bringing slices to room temperature for 20-30 minutes before serving for best texture and flavor.
Freezing Layers – Freeze unfrosted, cooled cake layers wrapped tightly in plastic wrap then aluminum foil for up to 3 months; thaw completely before assembling.
Slicing Cleanly – Use a long, sharp knife dipped in hot water and wiped dry between cuts to slice through the sticky caramel and toffee cleanly.
Creative Variations to Try
Chocolate Caramel – Add ¼ cup of cocoa powder to the dry ingredients and reduce flour slightly for chocolate cake layers that complement the caramel beautifully.
Salted Caramel – Use salted caramel sauce and sprinkle flaky sea salt between layers and on top for sweet-salty contrast that’s incredibly addictive.
Apple Caramel – Add ½ cup of finely diced apples sautéed with cinnamon to the layers along with the caramel for fall-inspired flavor.
Pecan Praline – Replace toffee pieces with chopped candied pecans or pecan praline for Southern-inspired nutty richness.
Troubleshooting Common Issues
Sunken Centers – This indicates underbaking or too much leavening; ensure your oven temperature is accurate and don’t open the oven door during the first 20 minutes of baking.
Dry Cake – Overbaking or too much flour causes dryness; measure flour properly by spooning into the cup and leveling, and remove from oven as soon as a toothpick comes out clean.
Sliding Layers – Assembling while cakes are still warm or using too-thin caramel causes this; ensure complete cooling and use caramel with proper thickness.
Tough Texture – Overmixing after adding flour develops excessive gluten; mix only until flour disappears and no white streaks remain.
Why This Recipe Works
The success of this caramel crunch layer cake relies on understanding proper cake mixing techniques and how to build stable layers that showcase both flavor and texture. The creaming method—beating butter and sugar together extensively—incorporates air bubbles that expand during baking to create tender, fine-crumbed cake rather than dense texture. Adding eggs one at a time ensures proper emulsification between the fat and water components, creating stable batter that bakes evenly. Alternating dry ingredients with liquid prevents overmixing; adding all the flour at once would require extensive mixing to incorporate, which would develop too much gluten and create tough cake. Heavy cream provides both moisture and fat that contributes to exceptionally tender crumb while also adding richness that complements the caramel. Baking at moderate 350°F allows the cake to rise properly and bake through without developing overly dark crust or dry edges. Using three 6-inch pans rather than two larger layers creates more dramatic height and provides additional surfaces for caramel and toffee, making every bite more flavorful and texturally interesting. The combination of smooth caramel sauce and crunchy toffee pieces creates essential textural contrast that prevents the cake from being monotonous despite the focused flavor profile. Refrigerating after assembly allows the caramel to firm slightly, which helps the layers adhere to each other and makes slicing cleaner and easier. At approximately 350 calories per slice, this cake is undeniably indulgent and should be considered a special occasion treat rather than everyday dessert, though the reasonable portion sizes mean you can enjoy a slice without excessive guilt when celebrating something worth marking with truly special food.
Final Thoughts
Caramel crunch layer cake demonstrates how focusing on a single flavor profile executed exceptionally well often produces more impressive results than attempting to incorporate too many competing elements. This recipe proves that home bakers can achieve professional-looking, multi-layer cakes without specialized equipment or advanced techniques when they understand fundamental baking principles and take care with each step. The combination of dramatic presentation and universally appealing flavors makes this the kind of dessert that generates genuine excitement and appreciation from everyone who sees and tastes it. While this cake is unquestionably rich and sweet, reserving it for truly special occasions allows you to enjoy the indulgence fully without concern, and the memorable experience it creates often matters more than the calories, making it worthwhile for those moments when celebration calls for something genuinely spectacular.