
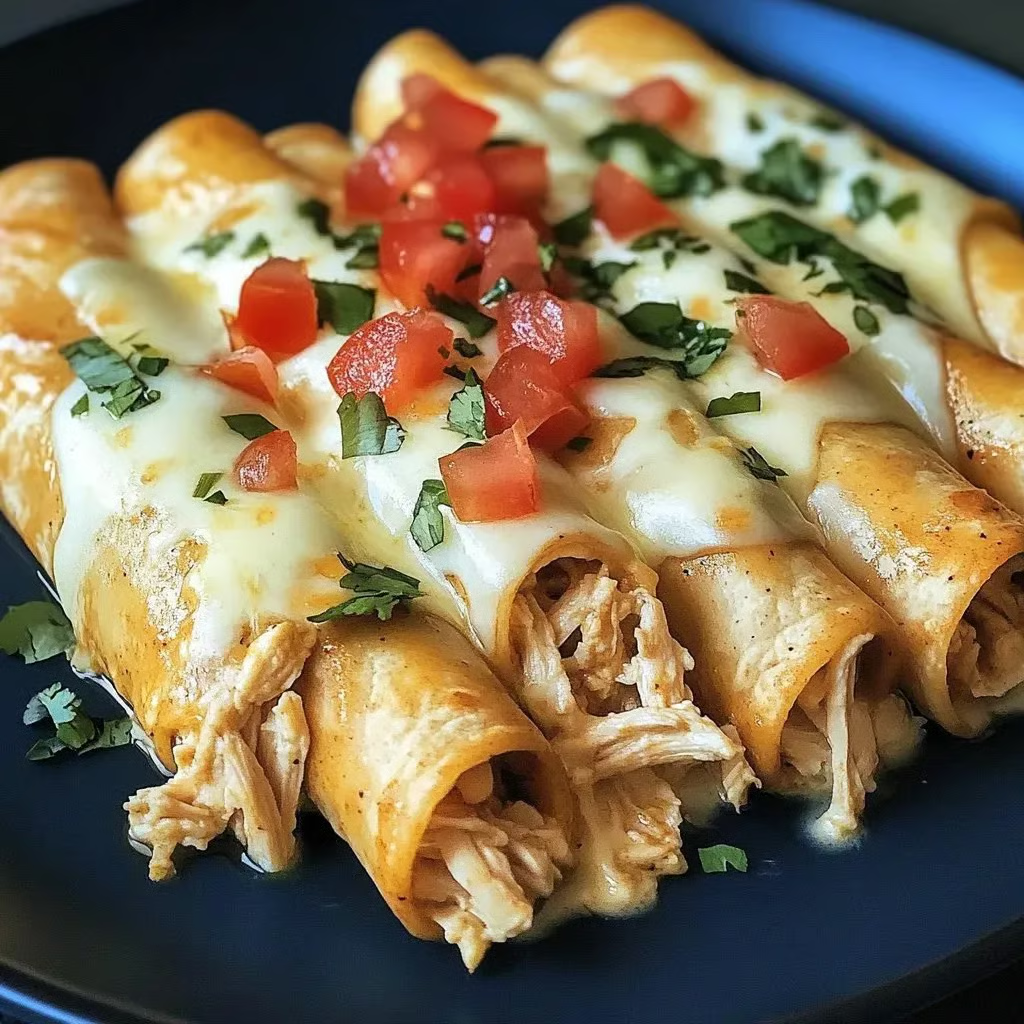
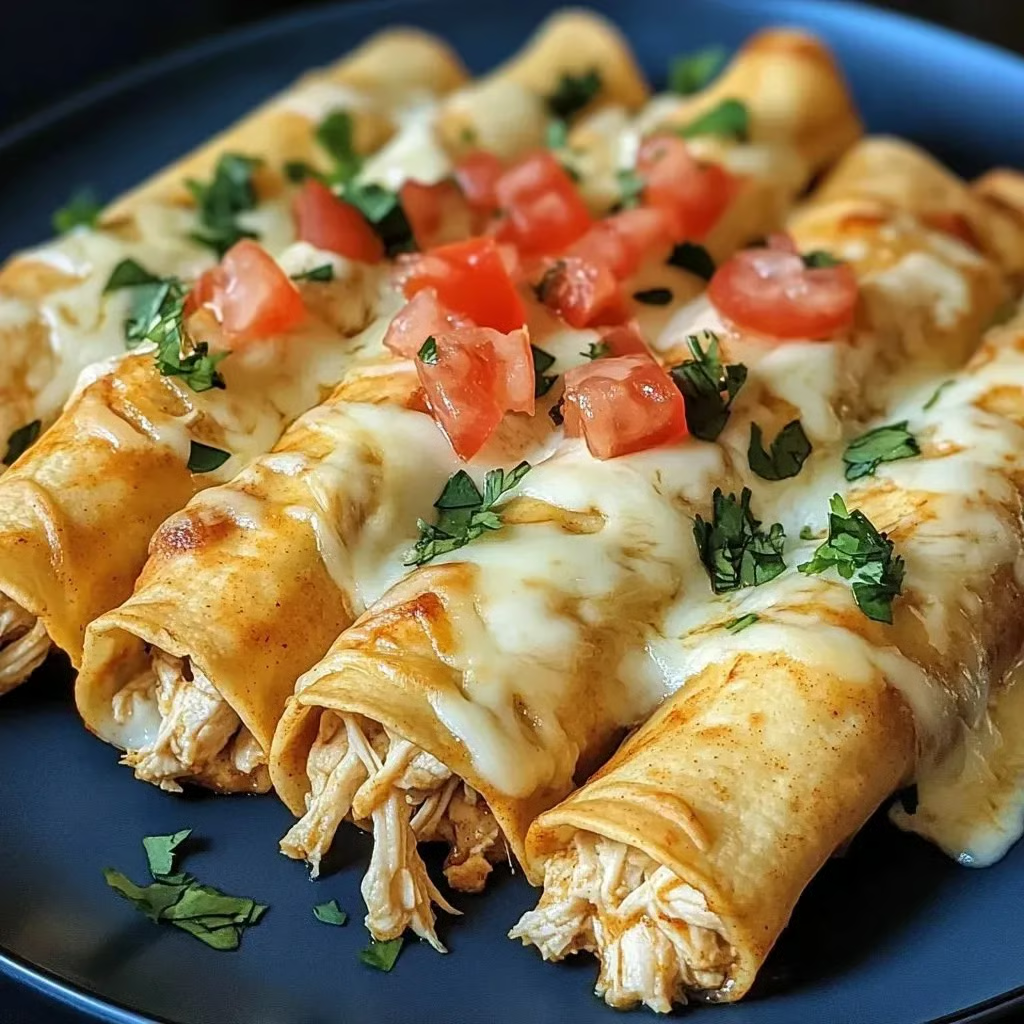
These crispy-on-the-outside, creamy-on-the-inside rolled tortillas transform simple rotisserie chicken into addictive finger food by mixing it with cream cheese, shredded cheese, and Southwestern spices before rolling tightly in flour tortillas and baking until golden and crunchy. The genius technique—using softened cream cheese to bind the filling and create luxurious creaminess, then brushing with oil before baking—achieves the satisfying crunch of fried taquitos without deep-frying, delivering party-perfect appetizers or family-friendly dinner in just 30 minutes that disappear the moment you set them out.
Why You’ll Love This Recipe
- Baked Not Fried – Achieves crispy, golden exterior through oven-baking with oil spray rather than deep-frying, making these healthier and easier.
- Cream Cheese Magic – The softened cream cheese creates impossibly creamy filling that holds together perfectly and provides luxurious texture.
- Rotisserie Shortcut – Using store-bought rotisserie chicken reduces prep time dramatically while adding extra flavor from the seasoned meat.
- Quick 30-Minute Prep – Ready from start to finish in just half an hour with straightforward assembly that doesn’t require professional skills.
- Freezer-Friendly – Can be assembled completely and frozen for up to 3 months, providing emergency appetizers or quick dinners on demand.
- Party-Perfect Format – The handheld, dippable format makes these ideal for gatherings where guests need finger food they can eat while socializing.
Ingredients You’ll Need
For the Creamy Chicken Filling:
- 2 cups cooked shredded chicken – Rotisserie chicken is the ultimate shortcut; provides seasoned, moist meat
- 4 oz cream cheese, softened to room temperature – Creates creamy binding; must be soft for easy mixing
- ½ cup shredded cheddar or Monterey Jack cheese – Adds melty, cheesy richness
- ¼ cup salsa – Provides moisture and Southwestern flavor; choose heat level to preference
- 1 tsp ground cumin – Contributes warm, earthy Mexican spice
- 1 tsp chili powder – Adds mild heat and color
- Salt and freshly ground black pepper to taste – Adjusts seasoning
- ¼ cup chopped green onions or fresh cilantro (optional) – Adds fresh, bright flavor
For Assembly and Baking:
- 8-10 small flour or corn tortillas (6-inch size) – Flour tortillas are easier to roll; corn more traditional but fragile
- Cooking spray or olive oil for brushing – Essential for achieving crispy, golden exterior
For Serving:
- Guacamole, sour cream, salsa, or fresh pico de gallo – Classic dipping sauces
- Shredded lettuce, diced tomatoes, or extra cheese (optional) – Garnishes for plating
Step-by-Step Instructions
Preheat and Prepare Preheat your oven to 400°F (200°C) and position a rack in the center. Line a large baking sheet with parchment paper or lightly grease it with cooking spray to prevent sticking.
Warm the Tortillas This crucial step prevents cracking: Stack the tortillas on a microwave-safe plate and cover with a damp paper towel. Microwave for 20-30 seconds until warm and pliable—they should be flexible and easy to roll without tearing. Keep them covered while assembling to retain heat and moisture.
Make the Creamy Filling In a medium mixing bowl, combine the shredded rotisserie chicken, softened cream cheese (it should be room temperature and easily spreadable), shredded cheddar or Monterey Jack cheese, salsa, ground cumin, chili powder, salt, and black pepper. Using a fork or sturdy spoon, mix thoroughly for 1-2 minutes until the cream cheese is completely incorporated and the mixture is creamy, uniform, and well combined with no lumps of cream cheese remaining. If using green onions or cilantro, fold them in now. The filling should be cohesive and slightly sticky.
Fill and Roll Place one warm tortilla on a clean work surface. Spoon about 2-3 tablespoons of the chicken mixture in a line down the center of the tortilla, leaving about ½ inch from the edges. Don’t overfill or the taquito will be difficult to seal and may burst during baking. Starting from one side, roll the tortilla tightly around the filling, creating a compact cylinder. Place the rolled taquito seam-side down on the prepared baking sheet—the seam should be on the bottom to prevent unrolling. Repeat with remaining tortillas and filling, spacing the taquitos about 1 inch apart on the baking sheet.
Oil for Crispiness Lightly brush or spray each rolled taquito all over with olive oil or cooking spray—this is absolutely essential for achieving golden, crispy exterior. Make sure all surfaces are coated. For extra cheesy goodness, you can sprinkle a little additional shredded cheese over the tops at this point.
Bake Place the baking sheet in the preheated 400°F oven and bake for 15-20 minutes, carefully flipping the taquitos over halfway through (around the 8-10 minute mark) to ensure even browning on all sides. The taquitos are done when they’re golden brown and crispy all over. For extra crispiness, turn on the broiler for the final 1-2 minutes, but watch carefully as they can burn quickly under the broiler.
Cool Briefly and Serve Remove from the oven and let the taquitos cool on the baking sheet for 2-3 minutes—they’ll be extremely hot inside and the brief cooling makes them safer to eat. Transfer to a serving platter and serve immediately while hot and crispy, with bowls of guacamole, sour cream, salsa, or pico de gallo alongside for dipping. Garnish the platter with shredded lettuce, diced tomatoes, or extra cheese if desired.
Recipe Notes & Tips
- Cream Cheese Temperature – Room-temperature cream cheese is essential for smooth mixing; cold cream cheese creates lumps.
- Tortilla Warming – Always warm tortillas before rolling; cold, stiff tortillas crack and tear when rolled.
- Tight Rolling – Roll tightly to prevent filling from falling out; loose rolls create gaps and uneven cooking.
- Oil Application – Don’t skip brushing with oil; it’s essential for achieving crispy, golden exterior without frying.
- Seam Placement – Always place taquitos seam-side down to prevent unrolling during baking.
- Freeze-Ahead – Assemble completely, freeze on baking sheet until solid, transfer to freezer bags; bake from frozen adding 5-10 minutes.
Nutritional Information
Prep Time: 15 minutes
Cook Time: 15-20 minutes
Total Time: 30-35 minutes
Servings: 8-10 taquitos (serves 4 as appetizer)
Calories: Approximately 200-250 calories per 2 taquitos (estimate)
Perfect Pairings
- Mexican Rice – Serve with cilantro-lime rice or Spanish rice for complete Tex-Mex meal.
- Refried Beans – Pair with refried beans or black beans for additional protein and authentic sides.
- Simple Salad – Balance the richness with crisp romaine or iceberg lettuce with lime vinaigrette.
- Margaritas – Complement with classic margaritas or Mexican beer for festive beverage pairing.
Ideal Occasions
- Game Day Parties – Perfect for football gatherings when you need finger food that feeds hungry crowds.
- Cocktail Parties – Ideal for serving as elegant appetizers that guests can enjoy while socializing.
- Family Dinners – Great for weeknight dinners when you want fun, interactive food everyone can customize with toppings.
- Potluck Contributions – Excellent for bringing to gatherings since they transport well and appeal universally.
Storage & Serving Tips
- Refrigerator Storage – Cool completely, store in airtight container for up to 3 days; reheat in 350°F oven for 10 minutes.
- Freezing Instructions – Freeze unbaked taquitos on baking sheet until solid, transfer to freezer bags for up to 3 months.
- Reheating Frozen – Bake frozen taquitos at 400°F for 20-25 minutes, no need to thaw.
- Serving Temperature – Best served hot when the filling is creamy and the exterior is at maximum crispiness.
Creative Variations to Try
- Buffalo Chicken – Replace salsa with Buffalo sauce and add blue cheese to filling for spicy variation.
- BBQ Chicken – Use BBQ sauce instead of salsa and add diced red onion for smoky-sweet version.
- Vegetarian Black Bean – Replace chicken with mashed black beans, corn, and bell peppers for meatless option.
- Jalapeño Popper – Add diced jalapeños and bacon bits to filling for spicy, savory kick.
Troubleshooting Common Issues
- Soggy Taquitos – Didn’t brush with enough oil or oven temperature too low; ensure generous oil coating and proper 400°F heat.
- Filling Leaks Out – Overfilled or rolled too loosely; use only 2-3 tablespoons filling and roll tightly.
- Tortillas Crack – Tortillas too cold or not warmed enough; always warm thoroughly and keep covered while assembling.
- Pale Color – Insufficient oil or didn’t bake long enough; brush generously with oil and bake full 15-20 minutes.
Why This Recipe Works
These baked taquitos succeed by combining proper filling composition with the right baking technique that creates crispy exterior without deep-frying. The filling uses cream cheese as the secret weapon—its soft, spreadable consistency when at room temperature allows easy mixing while its fat content and emulsifiers create luxurious creaminess that holds everything together. The cream cheese also prevents the filling from being dry, ensuring every bite is moist and satisfying. Combining cream cheese with shredded cheese creates textural variety—cream cheese for smoothness, shredded cheese for stretch and additional flavor. Using pre-cooked rotisserie chicken provides convenience while the seasoned meat adds extra flavor. The spices (cumin, chili powder) provide Southwestern character. Salsa adds moisture and tangy flavor. Warming tortillas before rolling is absolutely essential—cold tortillas are stiff and crack when rolled, while warm tortillas are pliable and flexible. The warming also makes the tortillas slightly sticky, helping them seal better. Rolling tightly prevents filling from falling out and creates compact cylinders. Placing seam-side down uses the weight of the taquito to seal the edge. Brushing with oil before baking is crucial—the oil conducts heat efficiently, promoting browning through the Maillard reaction and creating crispy texture through moisture evaporation. Baking at high temperature (400°F) ensures the exterior crisps before the filling dries out. Flipping halfway ensures even browning. At approximately 200-250 calories per 2 taquitos, these provide reasonable portions for appetizers.
Final Thoughts
Baked Cream Cheese Chicken Taquitos demonstrate that fried favorites can be successfully adapted for oven-baking when you understand the key techniques—proper oil application, high heat, and correct filling consistency—that create satisfying crispiness without deep-frying. The recipe proves that convenience ingredients like rotisserie chicken and cream cheese, when used thoughtfully, create reliable, delicious results that rival made-from-scratch versions while saving significant time and reducing complexity. These taquitos show that party food and family dinners don’t have to be separate categories—the same dish can work beautifully for both when it combines universal appeal (creamy, cheesy, crispy) with practical format (handheld, dippable, customizable). Whether you’re hosting game day parties that need crowd-pleasing finger food, planning cocktail gatherings that deserve elegant appetizers, feeding families who appreciate interactive dinners, or simply wanting the kind of crispy, creamy, Tex-Mex comfort that makes rotisserie chicken feel special, these versatile taquitos adapt to your needs while consistently delivering that perfect bite where crunchy golden tortilla gives way to luxuriously creamy chicken filling in quick, freezer-friendly, absolutely delicious harmony that makes every occasion feel festive and every bite prove that baked can be just as satisfying as fried.


