

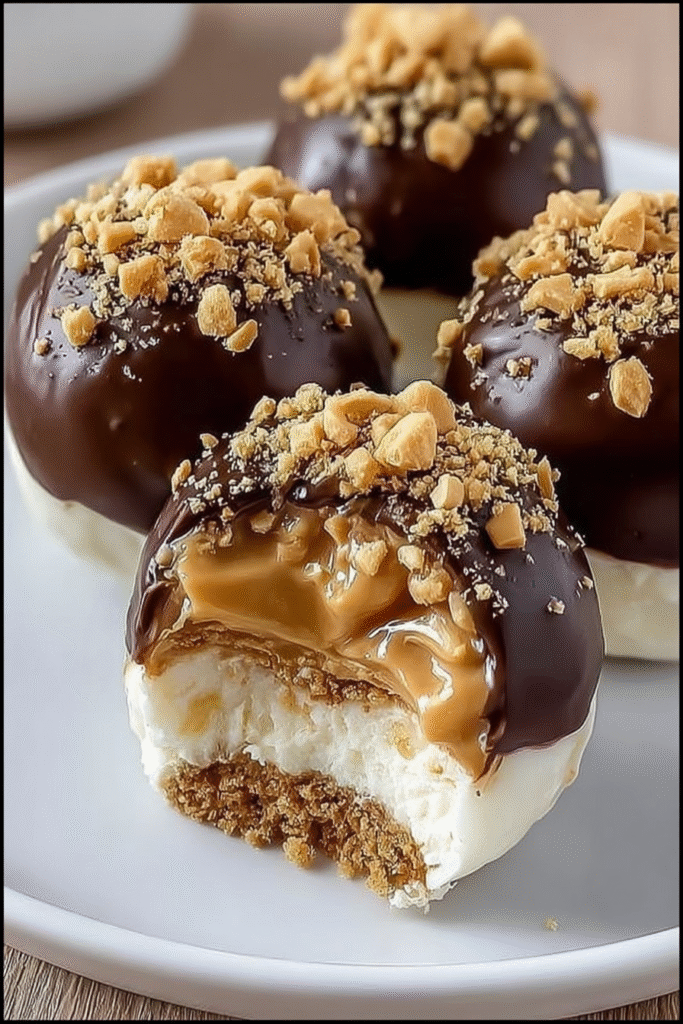
These No-Bake Peanut Butter Cheesecake Balls layer graham cracker crust with creamy cheesecake filling and a hidden peanut butter core, then coat the whole creation in glossy chocolate and sprinkle with crunchy peanuts for a multi-textured, decadent dessert. The recipe requires no baking whatsoever—just mixing, layering, chilling, and coating—making it perfect for hot weather, busy schedules, or anyone intimidated by traditional cheesecake’s finicky baking requirements. With their impressive gourmet appearance and bite-sized convenience, these frozen treats deliver the perfect balance of sweet, salty, creamy, and crunchy in every mouthful, proving that restaurant-quality desserts are entirely achievable at home without ovens or advanced techniques.
Why You’ll Love This Recipe
No Oven Required – This completely no-bake dessert sets through refrigeration and freezing alone, making it perfect for summer, small kitchens, or anyone who wants impressive results without baking anxiety.
Textural Symphony – Each bite delivers multiple contrasting textures—crunchy graham base, creamy cheesecake layer, gooey peanut butter center, silky chocolate shell, and crispy peanut topping—creating complex satisfaction.
Make-Ahead Convenience – These freeze beautifully and can be prepared days or even weeks in advance, making party hosting stress-free and ensuring you always have elegant dessert ready.
Bite-Sized Elegance – The individual ball format creates perfect portion control and sophisticated presentation that looks professionally made, ideal for parties where finger foods reign.
Customizable Components – From different nut butter cores to various chocolate coatings to alternative toppings, this recipe accepts endless variations while maintaining its essential character.
Crowd-Pleasing Flavor – The combination of peanut butter, chocolate, and cheesecake appeals universally across age groups, making this safe for mixed gatherings where pleasing everyone matters.
Ingredients You’ll Need
For the Graham Cracker Base
1½ cups (150g) graham cracker crumbs – Form the crunchy foundation layer; crush crackers yourself or use pre-made crumbs for convenience, approximately 10-12 full graham crackers.
6 tablespoons unsalted butter, melted – Binds the crumbs into cohesive base while adding rich, buttery flavor that complements the sweet layers above.
2 tablespoons granulated sugar – Sweetens the crust and helps bind it together while balancing the tangy cream cheese layer.
For the Cheesecake Filling
8 oz (225g) cream cheese, softened – Provides the rich, tangy base that defines cheesecake flavor and creates the filling’s structure; room-temperature cream cheese is essential for smooth texture.
¼ cup granulated sugar – Sweetens the cheesecake layer while maintaining smooth texture and balancing the tangy cream cheese.
½ teaspoon vanilla extract – Adds warm, aromatic depth that enhances sweetness and complements both the cream cheese and peanut butter.
⅓ cup heavy cream or whipping cream – Creates light, airy texture when whipped and folded into cream cheese, transforming dense filling into mousse-like consistency.
For the Peanut Butter Core
½ cup creamy peanut butter – Forms the gooey, rich center that provides signature peanut butter flavor and creates surprise element when bitten into.
2 tablespoons powdered sugar – Sweetens and helps firm up the peanut butter for easier shaping into balls that hold their form.
Pinch of salt – Enhances the peanut butter flavor and provides sweet-salty contrast that makes these addictive.
For the Chocolate Coating
1 cup semi-sweet chocolate chips or dark chocolate, chopped – Creates the glossy shell that seals in the creamy layers while adding bittersweet chocolate flavor.
1 tablespoon vegetable oil or coconut oil – Thins the chocolate for easier coating and creates smooth, glossy finish that sets beautifully.
For Garnish
¼ cup chopped peanuts, toasted (optional) – Add final crunch and visual interest while reinforcing the peanut butter theme throughout.
Drizzle of melted peanut butter (optional) – Provides decorative finish and extra peanut butter flavor for true enthusiasts.
Step-by-Step Instructions
Prepare the Graham Cracker Base – In a medium bowl, combine the graham cracker crumbs, 2 tablespoons of granulated sugar, and melted butter, mixing with a fork until all crumbs are evenly moistened and the mixture resembles wet sand that holds together when pressed.
Form Base Layers – Press a small amount of the crumb mixture (approximately 1 tablespoon) into the bottom of silicone ball molds or mini muffin cups, compacting it firmly to create a solid base layer, then refrigerate while preparing the next layer.
Beat the Cream Cheese – In a large mixing bowl, beat the softened cream cheese and ¼ cup granulated sugar with an electric mixer on medium speed for 2-3 minutes until completely smooth, fluffy, and lump-free, scraping down the sides as needed.
Add Vanilla – Add the vanilla extract to the cream cheese mixture and beat again for 30 seconds until fully incorporated.
Whip the Heavy Cream – In a separate clean bowl with clean beaters, whip the heavy cream on medium-high speed for 3-5 minutes until soft peaks form and the cream holds its shape but still looks slightly soft.
Fold Cream into Cream Cheese – Gently fold the whipped cream into the cream cheese mixture using a rubber spatula with smooth, sweeping motions from bottom to top, being careful not to deflate the whipped cream, until just combined with no white streaks remaining.
Add Cheesecake Layer – Spoon the cheesecake mixture over the chilled graham cracker bases in the molds, filling about three-quarters full and using a small spoon or your finger to create a small cavity or indentation in the center for the peanut butter core.
Chill the Cheesecake Layer – Return the molds to the refrigerator for 20-30 minutes to allow the cheesecake layer to firm up before adding the peanut butter center.
Prepare Peanut Butter Filling – In a small bowl, mix together the creamy peanut butter, powdered sugar, and pinch of salt until smooth and combined, then roll the mixture into small balls about the size of marbles (approximately ½ teaspoon each).
Add Peanut Butter Cores – Gently press one peanut butter ball into the cavity in the center of each chilled cheesecake mold, pushing it down slightly so it’s embedded but not touching the bottom crust, then smooth the top with a spatula if needed.
Freeze Until Firm – Place the filled molds in the freezer for at least 30 minutes or up to 1 hour until completely solid, which makes removing them from molds easier and prevents melting during chocolate coating.
Remove from Molds – Once completely frozen and firm, carefully remove the cheesecake balls from the molds (silicone molds make this easiest by gently pushing from the bottom), then place them on a parchment-lined baking sheet or tray.
Quick Freeze Before Coating – Return the unmolded balls to the freezer for an additional 15 minutes to ensure they’re very cold, which prevents them from melting or falling apart when dipped in warm chocolate.
Prepare Chocolate Coating – Melt the chocolate chips and vegetable oil together in a microwave-safe bowl in 30-second intervals, stirring between each burst, until completely smooth and glossy (approximately 1-2 minutes total), then let cool for 2-3 minutes until slightly thickened but still pourable.
Coat with Chocolate – Working quickly with one ball at a time, dip each frozen cheesecake ball into the melted chocolate using a fork or dipping tool, turning to coat completely, letting excess chocolate drip back into the bowl, then placing it back on the parchment-lined tray.
Add Toppings Immediately – While the chocolate coating is still wet, sprinkle the tops with chopped toasted peanuts and drizzle with extra melted peanut butter if desired, working quickly before the chocolate sets.
Final Chill – Refrigerate the chocolate-coated balls for at least 1 hour to allow the chocolate shell to set completely and the layers to firm up properly before serving.
Serve Slightly Softened – Remove from the refrigerator 5-10 minutes before serving to allow them to soften slightly for optimal creamy texture while maintaining the chocolate shell’s firmness.
Recipe Notes & Tips
Room-Temperature Cream Cheese is Critical – Softened cream cheese blends smoothly; cold cream cheese creates lumps no matter how long you beat it, so leave it out for 2 hours before starting.
Don’t Skip Chilling Steps – Each chilling phase ensures clean layer separation and stable structure; rushing causes layers to blend together or balls to fall apart during coating.
Freeze Before Coating – Very cold cheesecake balls prevent melting when dipped in warm chocolate and make coating easier with better results.
Silicone Molds Work Best – Silicone’s flexibility makes removing frozen balls effortless without breaking; alternatively, use mini muffin tins lined with plastic wrap for easy removal.
Add Oil to Chocolate – The tablespoon of oil thins chocolate to proper coating consistency and creates professional-looking glossy finish that plain melted chocolate can’t achieve.
Toast Peanuts for Best Flavor – Toasting peanuts in a dry skillet for 3-5 minutes intensifies their flavor and ensures crunchiness that stands out against the soft layers.
Nutritional Information
Prep Time: 45 minutes (20 minutes preparing + 25 minutes assembling)
Chilling Time: Approximately 2 hours total (30 minutes + 30 minutes + 15 minutes + 1 hour)
Total Time: Approximately 3 hours (mostly hands-off chilling)
Servings: 12-15 cheesecake balls (depending on mold size)
Calories: Approximately 260 calories per ball
Carbohydrates: 18g | Protein: 6g | Fat: 20g
Saturated Fat: 9g | Sugar: 12g | Sodium: 120mg
Perfect Pairings
Dessert Platter – Arrange on a platter with fresh strawberries, chocolate-covered pretzels, and mini brownies for impressive dessert spread.
Sweet Charcuterie Board – Include as part of a dessert board with cookies, candies, fruit, and chocolate for interactive party experience.
Coffee or Dessert Wine – Serve with hot coffee whose bitterness balances the sweet richness, or dessert wine like Port for adult gatherings.
Caramel Sauce – Drizzle with warm caramel sauce for extra indulgence and visual appeal that makes portions look more special.
Ideal Occasions
Party Desserts – The bite-sized format and impressive presentation make these perfect for birthday parties, baby showers, or any celebration requiring elegant finger foods.
Holiday Treats – Make ahead and freeze for Thanksgiving, Christmas, New Year’s, or Valentine’s Day when you need impressive dessert without last-minute stress.
Gift Giving – Package in decorative boxes or tins for homemade gifts that show effort and thoughtfulness beyond store-bought options.
Make-Ahead Entertaining – Prepare weeks in advance and freeze, then simply transfer to refrigerator the day before serving for effortless hosting.
Storage & Serving Tips
Refrigerator Storage – Store in an airtight container in the refrigerator for up to 5 days; they remain perfectly stable and delicious throughout this time.
Freezer Storage – Freeze for up to 2 months in airtight containers or freezer bags with parchment between layers; thaw in refrigerator overnight before serving.
Serving Temperature – These taste best slightly chilled rather than frozen solid; remove from refrigerator 5-10 minutes before serving for optimal texture.
Individual Wrapping – For gifting or meal prep, wrap individual balls in plastic wrap or place in cupcake liners for easy handling and portion control.
Creative Variations to Try
Nutella Version – Replace peanut butter filling with Nutella and top with crushed hazelnuts for chocolate-hazelnut variation inspired by Ferrero Rocher.
White Chocolate Raspberry – Use raspberry jam for the core and coat with white chocolate for elegant, fruity alternative.
Salted Caramel – Fill with thick caramel sauce and sprinkle flaky sea salt over chocolate coating for sophisticated sweet-salty combination.
Cookies and Cream – Fold crushed Oreos into the cheesecake base and top chocolate coating with more cookie crumbs.
Mocha Coffee – Add espresso powder to the chocolate coating for coffee-flavored twist that adults will love.
Almond Joy – Use almond butter for filling, coconut in the crust, and top with toasted coconut flakes for tropical character.
Troubleshooting Common Issues
Cheesecake Filling is Too Runny – Cold cream cheese or over-folded whipped cream causes this; use room-temperature cream cheese and fold gently, then chill longer before shaping.
Balls Fall Apart During Coating – Insufficient freezing or chocolate too hot causes this; freeze balls until rock-solid and let chocolate cool slightly before dipping.
Cream Cheese is Lumpy – Cold cream cheese or insufficient beating creates lumps; always use fully softened cream cheese and beat thoroughly before adding other ingredients.
Chocolate Coating is Too Thick – Insufficient oil or chocolate cooled too much; add more oil by the teaspoon and rewarm chocolate gently to thin it out.
Why This Recipe Works
These No-Bake Peanut Butter Cheesecake Balls succeed by creating distinct layers that each serve specific textural and flavor purposes while remaining stable through proper chilling and freezing. The graham cracker base provides crunchy foundation and familiar flavor, while the melted butter binds it firmly enough to support the layers above. The cream cheese filling enriched with whipped cream creates light, mousse-like texture that’s more sophisticated than dense baked cheesecake while remaining stable when chilled. The peanut butter core provides surprise element and gooey contrast to the surrounding creamy cheesecake. Freezing the assembled balls before coating ensures they’re solid enough to withstand the warm chocolate without melting or falling apart. The chocolate coating with added oil creates smooth, glossy shell that sets firmly in the refrigerator while adding bittersweet chocolate flavor that balances the sweet, rich filling. The sequential chilling and freezing steps allow each layer to set properly before adding the next, creating clean separation rather than muddled blending. At approximately 260 calories per ball, these provide controlled indulgence in bite-sized portions, with the richness meaning one or two balls satisfy without needing more.
Final Thoughts
These No-Bake Peanut Butter Cheesecake Balls prove that impressive, gourmet-quality desserts are entirely achievable at home without ovens, water baths, or professional pastry training—just thoughtful layering, proper chilling, and quality ingredients combined with patience. The recipe transforms simple components into something that looks and tastes professionally made, with the multiple textures and hidden peanut butter core creating surprise and delight in every bite. While these are certainly rich indulgences appropriate for special occasions rather than everyday eating, the controlled portion size and make-ahead convenience make them practical for real-world entertaining and gift-giving. The freezer-friendly nature means you can always have elegant dessert ready for unexpected guests or sudden cravings. Whether you’re hosting a party, preparing holiday treats, looking for homemade gifts, or simply love the combination of peanut butter, chocolate, and cheesecake, these frozen, chocolate-coated, perfectly layered balls deliver bakery-quality sophistication, crowd-pleasing satisfaction, and addictive flavor in every creamy, crunchy, gooey, decadent bite.


